Heirloom Petunias

Standard

photo (101) photo (102) photo (103) photo (104)

Petunias are native to South America.  Our flashy, modern hybrids are descendants of two species: Petunia axillaris and Petunia integrifolia.  (These are the current botanical classifications; both species have been renamed since they were first bought into cultivation.)  The first picture above shows Petunia axillaris.  Native to Brazil, it was in cultivation in Europe by 1823.  The flower has a very long throat; an uncommon characteristic in today’s hybrids, which are bred to have wide, flat faces.  Unlike the majority of modern petunias, this species petunia has a wonderful fragrance, especially in the evening.  The long, tubular throat of the flower is an adaptation to attract insect and bird pollinators.  I grew this species last season and I was quite pleased with its simple beauty, rain tolerance, heavy bloom, and hardiness.  The plants continued to bloom after frosts in the mid 20s F.

I do not have a picture of Petunia integrifolia.  Originally, this fragrant species was called P. violacea, for its deep purple color.  This species is native to Argentina and first bloomed in Europe in 1831.  It has smaller leaves and flowers than P. axillaris.  Hybrids between the two species appeared by 1837 in various colors: pale pink with a dark center, pale yellow with a dark center, white with a dark center.   Some of these early hybrids had streaked and veined flowers similar to a popular modern strain of veined petunias.  Double petunias were introduced from France in the 1840s.  Petunias became quite popular in the mid nineteenth century; later, by the 1880s, petunias lost popularity as geraniums became fashionable.  Their popularity revived again after 1920.

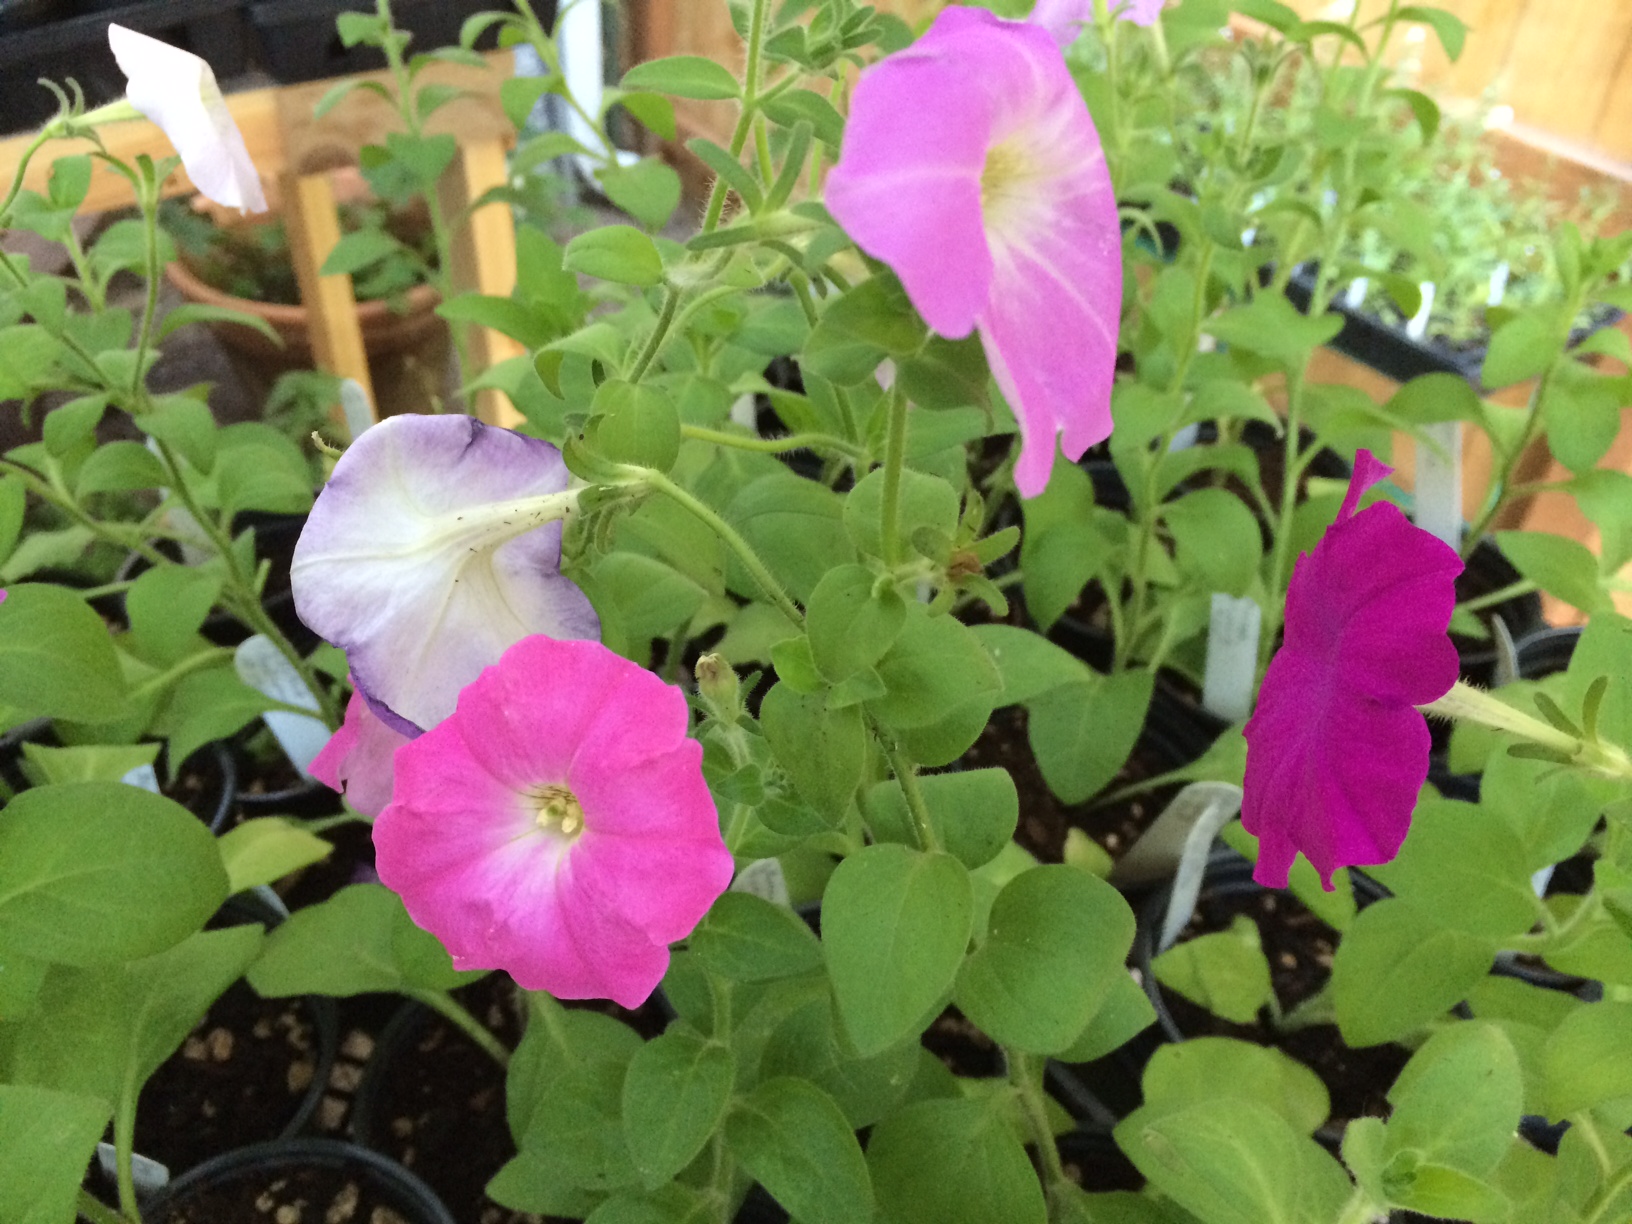
All the oldest named seed strains of petunias from the nineteenth and early twentieth century have disappeared.  The oldest seed strain available today of a named variety is ‘Balcony’, in a mix of colors, from the 1920s.  The second picture shows ‘Balcony’ blooming in pots.  The flower colors include purples, pinks, whites and lavenders.  Their fragrance is excellent, especially in the evening.  Fragrance, a charming attribute of many antique flowers, is often absent in modern hybrid petunias.  ‘Balcony’ petunias grow about 10 inches high and spread two to three feet wide.  This makes them suitable for bedding out, window boxes and hanging baskets.  The plants bloomed for months this last season.

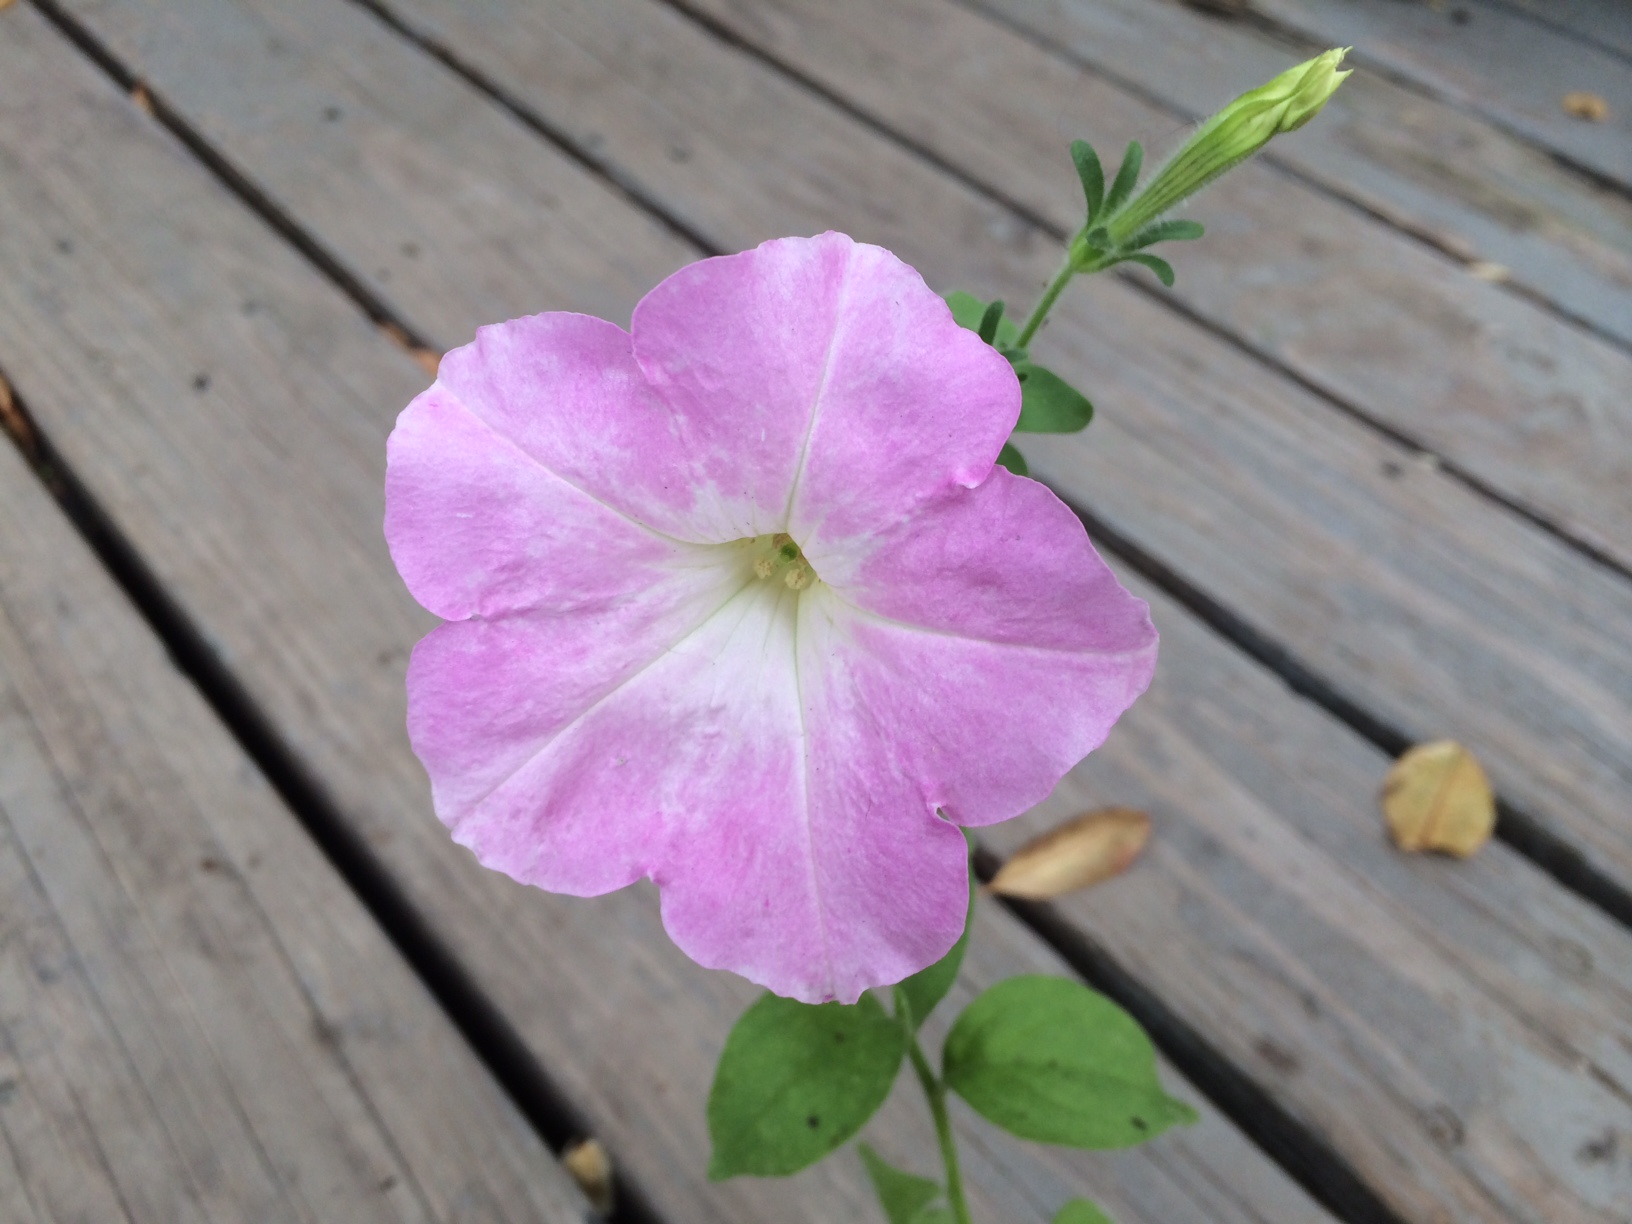
The last two pictures are of flowers of an heirloom “passalong” seed strain now sold as Old-Fashioned Climbing’ petunias.  Plant habit is gently trailing and the colors are soft pastels.  Petals of the individual flowers of this strain are thin and filmy, with a more delicate appearance than any other petunias available today.  The blooms glow with light captured in the transluscent petals, and fragrance is wonderful.  The plants are narrow— less spreading than modern varieties, so I planted them fairly close together in window boxes and baskets.  This strain is probably the oldest remaining example of nineteenth century petunias, considering the plant’s slender habit and the very delicate, filmy  flowers.

This year I will try a few more very heirloom petunias: ‘Rose of Heaven’ from the 1930s; ‘Alderman’ and ‘Fire Chief’, both from the 1950s.  All are fragrant.

Designing A Garden For Heirloom Plants

Standard

photo (92) photo (93) photo (94) photo (95) photo (96) photo (97) photo (98) photo (99)

Winter is an excellent time for gardeners to plan garden designs as there is minimal activity outside this time of year, epecially in northern climates.  As soon as soil can be worked you can begin executing your project.  In southern and low desert climates it is also a good time to plan your garden and build it because the cool temperatures make it easier to do heavy physical labor.

This last year I designed and built a garden in Early American style to hold my collection of antique roses, fruits, flowers and vegetables.  I had several goals: create a design based on historic models; maximize use of space and efficiency; minimize maintenance labor; use local materials, protect plants from predation and create the best growing conditions possible.  The first picture above depicts an American garden design plan from the late eighteenth century.  The original drawing is archived at the Essex Institute in Salem, MA.  My photo is taken from British and American Gardens of the Eighteenth Century, edited by Robert P. Maccubin and Peter Martin; The Colonial Williamsburg Press, 1984.  This style of design and use of space has its roots in Medieval gardens of Europe.  The plan is formal; beds are edged by timbers, are often raised or slightly raised and mud-free (and/or weed-free) paths separate beds.  This formal style is quite convenient to tend: crops can be separated and rotated; soil pH, texture and drainage can be adjusted from bed to bed, and some beds can be high water-use, while others may be medium or low water-use.  I find it convenient to place high water-use beds nearest the house and low water-use beds farthest away.

The second photo above is of my garden design for my garden in Corvallis, Oregon.  I measured the entire site, then made the drawing to scale on graph paper.  I used cut-out pieces of colored paper for structures such as the greenhouse, cold frames and porches.  I made labeled pieces of graph paper to indicate trees and shrubs.  The cut-out pieces can be moved around over the drawing until you determine where you want everything to go.  Shade is an issue in this garden, so sun-loving and shade tolerant plants were placed accordingly.

When the design was finished, trees and shrubs that cast heavy shade were removed or moved to new location; materials and workmen were sourced.  Tree and shrub roots were ground and removed.  Soil leveling was undertaken, then fences were built.  We tilled the soil, as seen in the third photo above, then raked the grass and roots into piles approximating the location of beds.  We had such a hot summer that the grass roots quickly died.  They provided immediate organic material for the soil.

We measured and drew out my design with spray paint and began to build our boxed beds.  I used 2′ x 12′ cedar lumber anchored in place with metal spikes set in concrete.  The fourth photo shows bed construction in the back yard garden.  Trenches 6 inches deep were dug to lay the timbers into.  Now we had beds raised six inches above the original soil level and 4 inches above planned level of the gravel.  This enabled us to use the native soil and amend it with 4 to 5 inches of compost, manure, greensand, wood ashes, alfalfa meal and bone meal (See the fifth photo above of the front garden).

After soil preparation, planting could begin.  The sixth photo above is a shot of the back garden two weeks after planting.  Vegetables grew quickly in the wonderful, organically amended soil.  The front garden was finished and planted a few weeks later (the seventh photo above).  The front beds were planned for bulbs, perennials and shrubs that use little or no additional water in our climate.  I do have to water the rose bed bordering the fence; watering deeply but infrequently once the roses are established.

The last photo shows one of the large 3′ x 3′ wooden tubs newly planted with ‘Blue-Podded Blauwschokker’ peas, which date to the sixteenth century.

The entire construction project took six months, from design to planting.  For a labor force we had two people working part time and one person working full time.  The garden is planted with heirloom plants dating from the ancient Greco-Roman period through the Oregon Trail Era (1830-1869).  Also included are a few more recent varieties, dating before and up to 1925, when the house was built.


IMPROVING YOUR SOIL

Standard

photo (91)

The quality of your garden soil is an important consideration in growing heirloom fruits, vegetables and flowers as soils come in a wide variety of textures and materials.  Soil texture describes the size of the mineral particles in your soil.  Soil particles in order of size, from smallest to largest, are: clay, silt, fine sand, medium sand and coarse sand.  The ideal garden soil (for most plants) is a loam soil, which carries particles of clay, silt and sand, plus organic matter.

Soil structure refers to the way soil particles bind together to form clumps.  In soils with good structure the spaces between particles are large enough to ensure good drainage but do not dry too quickly.  The best garden soil, loam soil, drains fast enough for root health but retains enough moisture for continued satisfactory growth.  Adding amendments to soils will improve its structure and provide food for beneficial microbes.

Another consideration to address before you add amendments to the soil is to test the pH— the measure of acidity to alkalinity in your native soil.  A pH of 7 is considered neutral and many plants are adapted to this condition.  A pH above 7 is considered alkaline while a pH below 7 is considered acid.  A pH test can serve as a guide to which plants you might be able to grow with ease and others that might be more difficult.  It is easier to make soils more alkaline, but difficult to acidify them.  Even though you may add sulfur or aluminum to your soil to acidify it, the subsoils beneath will remain alkaline and eventually the alkalinity will return, especially if your water is alkaline.  This makes it difficult to grow plants such as camellias, rhododendrons and azaleas (which prefer acid soil) in regions with alkaline soil and water.  Adding lime or crushed shells to acid soils will increase soil alkalinity.

One consideration in growing heirloom plants is to research soil amendment ingredients and practices used in the 19th century, as most of the plants still in existence from that era and before were selected under those soil conditions.  I am an organic gardener using these time-tested methods and believe that building your soil is crucial to long term success.  By amending your soil with such things as greensand, sulfur, bone meal, kelp meal and manure, you will enrich it and create a productive environment for soil bacteria.  You can choose from composted cow, hog or horse manure, alfalfa meal, cottonseed meal and guano or chicken manure to add significant nitrogen to your garden soil.  These all contain small levels of potassium and potash.  Bone meal, hoof and horn meal are excellent sources of potassium.  Kelp meal, wood ashes and greensand are significant sources of potash.  Greensand also contains many trace minerals.  Keep in mind that bone meal is somewhat alkaline and wood ashes are quite alkaline.  Home made compost is always valuable and usually contains a fair amount of nitrogen with smaller mount of potassium, potash and trace minerals.  Another option to improve soil is to plant cover crops and till them under.  Clover, rye, lentils, field peas, vetch and buckwheat are some examples.

This is the time of year to plan for improving your soil.  As soon as the ground thaws you can test the pH and as soon as soil becomes workable (not too wet to dig) you can add amendments.  It is important to learn as much as you can about what type of soil each plant you plan to grow prefers, for long term success.  For example, brassicas (cole crops like cabbage) have fewer pest problems and greater production in slightly alkaline soils.


Heirloom Cauliflower

Standard

photo (87) photo (88) photo (89) photo (90)

I grew two varieties of heirloom (open-pollinated) cauliflower in 2015.  The top picture shows a period illustration of ‘Henderson’s Early Snowball’ from Peter Henderson’s Garden and Farm Topics of 1884.  Peter Henderson was a market gardener farming in New Jersey during the mid-nineteenth century.  He created this variety for production in the American climate.  ‘Henderson’s Early Snowball’ was earlier to mature than any other variety at the time and a bit smaller, weighing about one pound.  Other varieties Henderson grew and recommended in 1867 are: ‘Early Erfurt’, ‘Early Paris’, ‘Half Early’ and ‘Wellington’.  By 1884 he added ‘Algiers’, ‘London Market’ and his own ‘Early Snowball’.  All varieties except the latter originated in Europe, which has a much more even climate than most of North America, so his introduction was better adapted to the wide swings of temperature in the U.S.  In 2015 I was unable to locate seed of any of the old European varieties, but this year seed of ‘Erfurter’ is being offered by Baker Seeds.  Since its maturity is listed at 55 days, it may be ‘Early Erfurt’, which dates to 1867 or earlier.  ‘Early Snowball’ matures in about 55 days from transplanting also.  It was introduced to the public in 1888 and Henderson commented that it took less growing space in the field, was more tolerant of temperature variations and was his most profitable cauliflower crop.

The second picture depicts ”Purple of Sicily’.   I have not been able to discover the date of introduction of this variety, but it reached the U.S around 1912.  It is purple in color while growing, but turns bright green when cooked.  Similar to broccoli in many respects, it is softer and more tender, like a cauliflower.  This variety is later maturing (90 days) than ‘Early Snowball’, but is more tolerant of high and low temperatures and is more insect resistant.  The heads are larger, about two to three pounds each.  I had great success with this variety it tastes as good as ‘Early Snowball’.

The third and fourth pictures above show heads of each variety after a frost of 19 degrees F.  I was surprised that ‘Purple of Sicily’ was still fine and edible after such a low temperature; while any other cauliflower would have most likely been destroyed, as was ‘Early Snowball’.

Cauliflower enjoys mild, cool temperatures.  Too high of temperatures or too dry conditions will cause it to “button”, which means the heads will only grow as large as a quarter instead of reaching full size.  In the nineteenth century gardeners grew crops of cauliflower in cold frames, timing an out of season harvest for late fall, winter and early spring.  The frames needed to be covered with mats for the night to insulate them from extreme cold.  An important consideration was to harden off the plants well before planting outside in cold conditions.  These nineteenth century methods used no fossil fuels so left a very low “carbon footprint”, an important fact in today’s warming climate.  Their methods can be undertaken today; what is required is careful timing and management.

For late spring crops, start seeds indoors in February.  When the plants have 6 to 8 leaves, transplant out into cold frames.  Plants put into frames in March can be transplanted into the open garden in April.  Hardening the plants in frames makes them able to withstand cool spring temperatures.  The plants should be ready to harvest in June, before it gets too hot.  You can direct seed in April also, for plants to mature in late June.  For fall crops, seed can be sown July through mid August, transplanted out in 5 weeks, to mature in September to October.  Adjust these timings to your climate; these recommendations are for the northwest U.S.  In climates with cool summer temperatures cauliflower can be grown well in summertime, too.  Cauliflower is not as frost hardy as cabbage or Brussels sprouts; both of those crops were still usable here after the 19 degrees night.

I will definitely grow both of these heirloom cauliflowers this year and I will try ‘Erfurter’.  I love cauliflower and feel it is worth the extra trouble to grow.  When you grow your own organically, as I do, you know it will taste great and you will reduce your carbon footprint by not purchasing vegetables shipped long distances.  Also, you are not unknowingly eating a GMO products, which we know have yet to be labeled as such.  The Baker Seeds website is http://www.rareseeds.com