ALOE VERA, AN HEIRLOOM PLANT EASY TO GROW ORGANICALLY

Standard

IMG_0106

A note to readers: I apologize for the hiatus in writing this blog; the organic greenhouse/nursery I managed closed its doors and I embarked upon a new life adventure. I now work as a Collections Gardener at The Living Desert Zoo and Gardens in Palm Desert, California. There, I am helping to preserve, protect, and propagate rare and ubiquitous plant species from deserts of North America, Africa, Arabia, Madagascar and Australia. I am involved in the conservation of plant and animal species facing extinction. I will continue to contribute to this blog about heirloom plants grown organically. Organic gardening is part of the best future for our planet; organic gardens actually directly capture carbon rather than indirectly and directly release carbon into the earth’s atmosphere. I urge you to do your part to capture carbon and minimize emissions. Together we can save Earth for future generations of all life forms!

ALOE VERA, AN HEIRLOOM PLANT EASY TO GROW ORGANICALLY

By James Sagmiller

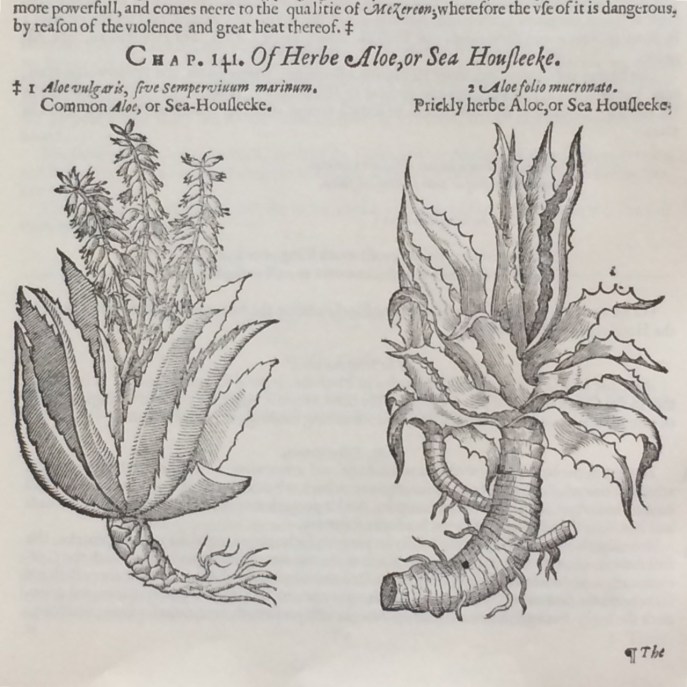
Aloe vera is one of our oldest cultivated plants and was primarily grown for use as a medicinal plant. It is mentioned in the “Ebers Papyrus” dating to the 16th century B.C. in Egypt. It was well known by the ancient Greeks and Romans. In Alexander the Great’s time, about 330-360 B.C., a center of cultivation was the island of Socotra in the Indian Ocean and about 240 miles from the Arabian Peninsula. (Aloe vera is carefully illustrated, described, and its uses listed in a herbal written by Dioscorides about 78 A.D., De Materia Medica. It is known to us through a copy included in the Codex Anicinae Julianae of 512 A.D. Dioscorides recommends Aloe vera be used topically for coagulating blood, staunching wounds and for hemorrhoids. He suggests mixing it with wine and honey to use as a rinse for tonsils, gums and sores of the mouth. He says it may be ingested as a “purgative” (laxative). He states that the plant was grown in India, Arabia, Asia, Apulia (Italy), and Andros.

Our illustration above is from The Greate Herball of Gerard (1633 revised version) page 507. The plant on the left is Aloe vera, on the right is Agave americana, a plant often confused with various species of aloe. Gerard repeats the medical uses of Dioscorides, but adds that Aloe vera, when ingested will cure worms also. It is interesting that Gerard recommends hanging live aloe plants from the ceiling, mentioning it will stay alive for months. In cottages in England at that time the warmest area (and probably least prone to frost) in a house would have been near the ceiling.

Indeed, Aloe vera is a tender plant in northern climates. It is actually hardy to about 25 degrees F. when it is grown on well-drained, dryish soil. Plants are commercially grown today in the West Indies on islands such as Curacao and Barbados. The old, incorrect name Aloe barbadensis may derive from the assumption that the plant originated in the West Indies, but Aloe vera is thought to be native to the Arabian Peninsula or possibly North Africa.

Medical use of Aloe vera today is quite controversial, according to the Natural Medicines Comprehensive Database (NMCD). Topical use is generally accepted as safe for use in cosmetics and for burns, sunburns, wounds and mouth rinses. Most of the controversy concerns ingestion of  Aloe vera for various ailments, such as psoriasis, weight loss, constipation, HIV/AIDS, and Herpes simplex. Results of several studies are conflicting, so it is advised to ingest Aloe vera with caution and awareness of risks involved. Aloe vera as ingested is not recommended for lactating women, or within two weeks of surgery, and will react toxically with the drug Digoxin.

I personally have found the fresh, live juice to help heal sunburns and other burns quickly. The fresh gel acts as a moisturizing, protective layer on the skin. The fresh juice contains vitamins C and E plus various minerals. It may be that Aloe vera is most effective only when fresh and “alive” and may change chemically and in effectiveness when dried, pasteurized, or otherwise processed, much as is the case with fresh, as opposed to processed garlic.

Fortunately, Aloe vera is easy to grow! Plants produce prodigious stemless offsets which can be easily used to produce new plants. Take offsets and place them in a shady spot in a temperature of between 60 degrees F. and 90 degrees F. Let them dry off for two or three days, then prepare to pot them up. An organic cactus mix will work, but should not be too alkaline (high pH). If that is used, mix 2 parts cactus mix + 1 part organic potting soil + 1/3 part perlite + 1/16 part coffee grounds + 1/16 part bone meal and mix all together. To make your own organic mix, use 3 parts organic potting soil (or organic compost plus rotted bark or peat) + 1 part sharp grit (such as #2 chicken grit) + 1/16th part bone meal. A clay pot is really best, as the roots of Aloe vera need air. Try to think of a plant’s roots as its lungs. It needs a moist, airy environment to survive. A plastic pot may be used for an aloe plant, but place gravel or perlite in the bottom ⅛ of the pot for drainage. Make sure the pot has drainage holes for excess water to drain away. A mulch of rock chips or grit is excellent and attractive around an aloe plant, and serves to hold new offsets in place until well-rooted, but is not necessary. Room (or greenhouse) temperatures of 65 degrees F. to 90 degrees F. are preferred for this aloe. Aloes grow faster with more light and heat.

Plants can be grown in full sun as we do here outside in the low desert of California’s Coachella Valley, but Aloe vera is adaptable to light shade or part shade and fine plants may be grown in lower light conditions. Just be sure to take care not to over water your plants in shade or dark rooms. The best indoor plants I have seen were grown in east or southeast-facing windows.

Once a year, in mid-spring, top dress your potted plants with bone meal and a thin layer of fresh compost, or repot them one pot-size up.

It is great to have fresh Aloe vera on hand for burns and minor cuts, and the plants are quite beautiful with their blue-green foliage. In full sun, the foliage turns reddish. If lots of light is available, your Aloe vera will bloom with stalks of lovely yellow flowers that attract hummingbirds.

SOME INTERESTING HOLIDAY GIFT PLANTS

Standard


Most of us are quite familiar with common garden geraniums (Pelargonium spp.) with their brightly colored blooms and leaves.  We usually grow these outside for summer bedding color.  Other (and not as well-known) geraniums are grown for their scented leaves.  They can be grown outside for bedding or put into mixed containers for scent, but they make excellent house plants. 

Scented-leaved geraniums have been grown since the 1600s and several are heirloom plants.  At one time more than 100 varieties were grown; each one with a singular, distinctive fragrance.   Several of the kinds still available are true species, some are selections out of species and a few are hybrids.   Fragrances include rose, lemon, mint, apricot, pineapple and coconut.  To release the scent of the leaves, simply gently brush against them or rub lightly with your finger.   It is pleasant to have fragrant plants in the house in winter, even without flowers.   How many of us have tried to bring plants with fragrant flowers into bloom in the winter?  It is not an easy task, especially with our short days, minimum window space.  But scented geraniums carry their scent year-round and are not difficult to grow. 

‘Skeleton Rose’, dating to about 1700, is one of the oldest scented geraniums around.  It has a delicious rose-lemon scent and beautiful, deeply-divided leaves.   Flowers appear in late spring and are lavender. 

‘True Rose’ has beautiful divided leaves of quite different shape from ‘Skeleton Rose’, and makes a slightly larger plant.  It has been grown since 1787 and the oil from its leaves is used in perfumes.   This variety has pink blooms in late spring. 

‘Peppermint’ has soft, velvety leaves with a fresh, minty smell.  This variety seems to like more water and cooler temperatures than other geraniums.  The plant can become larger than other kinds also.  ‘Peppermint’ has been grown since 1806.

‘Lemon Fizz’ is a twentieth century plant and is probably the most popular scented geranium today.  Its leaves release a wonderful, sweet, lemon fragrance that is comparable to true lemon.  

In general, I have found that scented-leaf geraniums prefer a more neutral pH (6.0) than most other geraniums, and like a bit more moisture.  It is best to let the plants get sub-moist, but not completely dry; then water them thoroughly so the water runs out the bottom of the pot.  A sign that your scented-leaf geraniums are being kept too dry is the presence of drying, browning leaves at the base of the plants.  A sign that they are being kept too wet is transparent, yellowing leaves.  A fast-draining, organic succulent potting mix is excellent.  These plants are easy to grow organically.  Aphids and spider mites are seldom troublesome, but if they appear, can be controlled easily with certified organic pest controls or by spraying the leaves with a jet of water, washing off the bugs. 

Christmas cacti (Zygocactus spp.) have no fragrance, but what a show they give in the darkest days of the year!  Their flowers are silky and translucent, and bloom in shades of pink, red, white and lavender.   Unlike most cacti, Christmas cacti have no spines, but possess unusual, flat leaves.  In their native habitat, they live in trees.  They like a moist situation and prefer to become sub-moist before they are watered.  They do not like to dry out completely either, and will die if they get too dry.   Likewise, they will die if they are watered too much, so try to keep the plants moist.  A rich organic potting soil works well, and plants prefer to become bit pot bound, when they bloom the best.  In fall, winter and early spring Christmas cacti can be given a spot in a sunny window, but in summer they need part shade or some protection from full sun. 

Christmas cacti are daylight sensitive.  Flower buds are set in fall, when days are shorter and nights longer (12 to 14 hour nights).  Temperatures of 50 degrees to 55 degrees F. will encourage bloom.  The plants must have complete darkness at night to set flower buds, so when you are trying to get them to bloom, make sure there are no lights on in the room or outside the window at night. 

GROWING FRESH VEGETABLE SPROUTS

Standard

Sprouts


You can grow fresh, nutritious, organic vegetables right in your kitchen any time of year!   Nutritious sprouts can be grown from seeds in 3-6 days.  Germination releases a variety of nutrients, enzymes and proteins that makes sprouts easier to digest than dry seeds.  Sprouting increases the amount and bio-availability of proteins, vitamins and minerals.  Sprouts are high in protein, low in fat, high in fiber and loaded with vitamins. 

Sprouts are more concentrated in food value than fully grown vegetables, but most people add them to foods rather than eating them alone.  You can use fresh sprouts to finish a salad, or put them in a sandwich.  Sandwich fillings can be made by grinding sprouts to a paste.   Sprouts also make healthy, flavorful additions to stir fry dishes, soups and casseroles.  Some more popular uses are as additions to dips or fresh juices.  Sprouts can be added to pancake batter or scrambled eggs, too. 

To sprout seeds at home, purchase organically grown seeds labeled for sprouting.  This will be the cleanest, safest seeds you can use.  Start with small amounts of seed.  Try a tablespoon or two, or up to ½ cup if you are sprouting larger seeds, such as mung beans or peas.  Room temperature (65 to 75 degrees) is perfect for sprouting.  The rinse water should be about the same temperature.  Place the seeds in a wide mouth quart glass jar and then wash (rinse) them thoroughly with clean water.  A special sprouting jar lid will work well to drain the seeds, or cheesecloth fastened with a rubber band can be used.  Fill the jar with 2 cups of water and soak the rinsed seeds for 8 hours, or overnight.  In the morning, drain the seeds and rinse them again, twice.  Place the jar upside down, at an angle inside a clean bowl to finish draining for a few minutes.  Place the jar right side up again and place it out of direct sunlight, but not in total darkness (some seeds need light to germinate).   Rinse the seeds at least twice a day for the sweetest, freshest taste.  

When to harvest varies with the kind of sprout grown.  Most are ready in 3 to 4 days, but some take longer (mung beans take about 6 days).  Experiment with tasting the sprouts to see what size you prefer.  Usually they taste sweetest when tails emerge.  After harvest, store sprouts in covered containers in the refrigerator.  Fresh sprouts will last about a week in the refrigerator. 

You may have heard of problems with commercially grown sprouts that made people sick.  As long as you use clean jars and lids and rinse the sprouts at least twice a day there is little chance of a problem.  Remember to wash your hands after handling raw meat, and before touching fresh sprouts or any raw, uncooked food, as you prepare a meal. 

Some favorite sprouting seeds are: alfalfa, which is a cancer preventative loaded with vitamins A, B, C, D, E, F and K; mung beans, loaded with protein, fiber and vitamins A, B, C, and E, plus trace elements; peas, with vitamins A, B, C and E, and trace elements.  Broccoli, cabbage, mustard, arugula and radishes are all excellent and nutritious.  Several blends of sprouting seeds are now available.  They are packed with vitamins, minerals, proteins and fiber.

2017 SEPTEMBER GARDENING

Standard

IMG_5334

We have had a very hot summer this year so watch for spider mites on your garden plants, especially those in hot, dry locations.   If you have kept your house plants outside, inspect them carefully before you bring them into the house.  Check for any sign of insects or diseases and if you find any, treat with organic pest controls.  Watch for slugs and cultivate to expose and destroy grasshopper eggs.  Also, watch for corn earworms. 

Another important pest in Western Montana gardens are voles.  Wrap your fruit trees for winter with plastic tree guards so that these rodents will not strip the bark.  An effective method to protect the root ball of trees from being dug into and eaten, is to plant them using wire baskets over the roots.  Voles cannot chew through hardware cloth or into the new vole wire cages.  Caging is a safe-for-the–planet method that works for fruit trees, roses, shrubs, perennials and bulbs.  Be sure to cover the surface of the ground inside the basket edge so rodents cannot burrow down from the top.

Harvest peas, beans and cucumbers consistently in September to keep them producing.   Late in the month remove blossoms from eggplant, peppers, melons and squash in order to direct energy into to ripening remaining fruits.  Cover sunflowers from birds and pinch tomato tips.  Cultivate or hoe around cabbage, cauliflower, broccoli, turnips and celery.  Keep late maturing cauliflower and broccoli well-watered.  Plant garlic and shallots and over-wintering onion sets.  You can still direct seed a few plants for fall/winter greens: arugula, lettuce, radishes, cress, corn salad, chervil and kale. 

If you plan to grow crops under tunnels or in a cold greenhouse over the winter, plant seed (early in the month) of crops for winter use: chervil, kale, spinach, lettuce, radishes, corn salad, and winter cress.  Later in the month, from the 20th to the first week of October, plant seeds of cabbage, cauliflower and other brassicas for transplanting out into tunnels in OctoberHave winter covers ready by October 1. 

September is a good time to make new beds for growing mushrooms.  Well-rotted horse manure is excellent. 

Gather ripe seeds of any vegetables (or flowers) you want to save seed from.

Prepare beds for planting bulbs.  Sow seeds of bulbous flowers collected in summer.  Transplant peonies and lilies and dig dahlias after killing frost.  Transplant pinks and carnations (with root ball intact) late in the month and plant out any other perennials and biennials where they are to bloom.  Most perennials can be divided now and replanted where they are to bloom. 

Gather ripe fruit from apples and pears.  Remove diseased fruits and “mummies”, rake up leaves under fruit trees and destroy them (to prevent apple scab).  Prepare equipment to make cider. Prepare beds for planting fruit trees, using well-rotted manure, digging down 18 inches.  Keep strawberries free of weeds and the soil moist.  If you plan to force strawberries in winter, now is the time to take them up and pot them.  Cut a root ball out with a knife, trim off dead leaves and runners and pot into 7 or 8 inch pots.  Place them in shade and water well.  Then plunge the pots in earth up to the rim.  Take them up and into frames or greenhouse before cold weather. 

Protect ripening grapes from birds with netting or gauze; keep weeds away from plants.  If wasps are a problem, hang containers of sugar water to catch them. 

Trim branches of evergreens and walnut trees, so wounds will heal before winter.  Keep weeds cleaned out from nursery beds and plantings of young trees.  Lay down grass turf this month or plant lawn seed. 

September is an excellent time to apply an organic from of potash to your garden plants to strengthen stems and roots in order to ripen them before winter.  Kelp meal can be applied as a surface dressing and watered in or you can do a foliar spray of seaweed twice during the month of September.  Do not apply nitrogen this month as it forces growth that will surely be winter killed.


OCTOBER GARDENING CALENDAR

Standard

fullsizerender-6

OUR PHOTOGRAPH SHOWS A BLOOM OF ‘DART’S DASH’

A RUGOSA ROSE FROM THE 1930s

GENERAL

Bring in any remaining vegetables to ripen, or cover them with a row cover designed to take frosts into the mid-20s.  Plant bulbs, wildflower mixes and hardy annuals.  Harvest apples and pears, and sow seeds of hardy trees and shrubs.

VEGETABLES

Have row covers ready for tender plants that might succumb to fall frosts.  Crops can still be harvested in cold frames and under row covers into November.  Ventilate plants in frames and give air and water freely.  When it is cold, cover with mats or straw and do not let the sun shine on an open frame full of frozen plants.

Finish digging potatoes early in the month in case we get a heavy frost.

Harvest Brussels sprouts, cauliflower, cabbage, carrots, lettuce, spinach and herbs.  Harvest and store cabbages late in the month: Turn them upside down to dry, take off extra leaves and place them in a trench of sand and cover with a wet-proof cover open at both ends to keep them dry.  Close the ends with straw when frosty.  Thin spinach and lettuce planted last month.  If you have protected your pepper plants from frosts and heavy frost is on the way, pull up the plants and hang them upside down to ripen fruits.  Harvest ripe squash and pumpkins, leaving a one to one and a half inch stem.  Dig, divide and transplant garlic and shallots.  Hang onions to dry in an airy cool place.  Cut asparagus and perennial herbs back before winter.  Carrots may be left in the ground and covered with two feet of straw, leaves or peat moss to pick as needed most of the winter.

FLOWERS

Plant bulbs this month, finishing by November 1; give a top dressing of bone meal to the previous season’s bulbs beds.  Divide and replant peonies and plant wildflower seed.

Divide perennials late in the month, after cool weather begins, into November.  Sow seeds of late-blooming perennials (to sprout in spring).  Trim lavenders and other shrubby herbs to a few inches and give them a light dressing of manure.

If not already done, dig tuberoses, dahlias, amaryllis, glads and other tender bulbs.  Spread them out to dry in a warm room, clean off hair roots and decaying foliage and pack them up in dry boxes of sawdust.  Keep your bulbs in a cool, dark, dry, frost-free location.  Weed established bulb beds and spread bone meal as a top dressing.


FRUIT

Harvest apples and pears for storage when the trees are dry.   To test for ripeness gently twist fruit gently one way or the other.  If it comes off easily it is ready to pick.  Place harvested fruit in heaps in a shed to dry further for 10 to 14 days.  Examine each fruit for bruises, which will cause rot in storage.  Wipe each one dry, wrap in paper and store in barrels; or, wipe dry and place in dry sand in the barrels.  Keep in a cool, dry cellar away from frost.

TREES, SHRUBS AND ROSES

Transplant trees, shrubs and fruit trees late in month.

Watch for leafhoppers on roses and spray before severe frosts occur to get last generation before winter.  To protect tender roses over the winter in cold areas, mound each plant with soil about 6 inches deep and place a layer of evergreen branches over that.  In the spring the soil can be removed gradually, about an inch at a time.  In the spring, uncover the plants gradually.  Use a gentle jet of water from a hose once a week or so, finishing about May 20.   If a heavy late frost threatens, place the evergreens over the crown of the plant again, removing them when weather warms.


FALL IS FOR PLANTING TREES, SHRUBS, ROSES AND WILDFLOWER SEED!


Standard

AURICULA PRIMROSES

When we think of primroses, the first thing that comes to mind are the ‘Pacific Giant’ hybrid primroses we see in garden centers.  Actually hundreds of species of Primula are in existence, and some species have been brought into gardens and significantly developed.  The auricula primroses, members of the species P. auricula, have been grown in gardens since the 1500s.  They have evergreen leaves that curl around in a way that resembles the ear of a bear.  When first cultivated, they were called ‘Bear’s Ears’.  Charles l’Ecluse (known as Clusius) is the first person known to have grown auriculas in a garden.  This was after 1573; he grew two kinds.  The first auriculas grown in England are illustrated first left above, in a woodcut from Gerard’s Great Herbal of 1596.  By 1639, at least 15 different colors and even striped forms were grown.  Auriculas were a popular plant beginning in the early eighteenth century when keen collectors began to grow and exhibit them in competitions.  These growers were called ‘florists’.  Several specialized classes of auriculas came into existence over the following centuries.  Potted plants were (and still are) exhibited in flower on black painted shelves in a stage-like display.  The black background highlights the beautiful colors of the flowers.  Auriculas do have an extremely wide color range, much greater than practically every other kind of flower.  The second picture shows a tawny-colored auricula, a color popular in the 1600s.  Auriculas were extremely popular in the nineteenth century, but curiously, are not well-known today.

Auriculas are native to the Alps and prefer gritty, moist, well-drained soil with a good amount of humus.  They are tolerant of alkalinity and extremely winter hardy to USDA climate zone 3, or even zone 2 if covered with snow all winter.  This means they are perfectly suited to growing all over Montana.  They are shade plants, especially when grown at lower altitudes.  The individual plants are small, only about 8 to 12 inches tall when blooming.  The engraving third from left depicts a garden auricula from 1908.  A gardener must watch that vigorous neighboring plants do not overtake them.  Being evergreen, they grow rather slowly.  I found that a mulch of sharp grit, about the diameter of turkey grit, is excellent for them and will discourage slugs.  Auriculas thrive when grown organically and enjoy soil amendments such as bone meal, composted manure, kelp meal, wood ashes, and grit for excellent drainage.

The classes of exhibition auriculas are usually grown in pots and are smaller and less vigorous than garden auriculas.  The pots used to grow them are taller than average, as the plants have a long tap root.  Growers commonly use an organic soil potting mix with added grit, bone meal and wood ashes.  Grit is especially important for drainage, but also for itsmineral content.  Indeed, the flowers have a wonderful mineral-floral fragrance unlike any other.  The last picture above shows a double exhibition auricula.

Auriculas are available from specialist growers as plants or seed.  I grow mine from seed planted in a fine, fast-draining seedling mix, covered with glass and placed in a shaded cold frame.  I plant seeds in late fall or winter, so the seeds have a cold period before they sprout in the spring.  The plants are usually large enough to pot on by midsummer.  Mature plants are best divided  midsummer.  I would urge gardeners to try auriculas; they are beautiful and rewarding to grow.  If grown in the garden, they might be best appreciated in raised beds, where their delicate flowers can be observed.

April Gardening Calendar

Standard

photo (133)

April is another busy month for gardeners; usually a month characterized by ups and downs in temperature.  Keep watch for frosts; protect cold frames with mats if frosts are imminent, and admit air daily as weather permits.  Finish pruning fruit trees if not done, plant grapes; fertilize and prune blackberries.  Check your fruit trees and roses for pests as soon as they bud and leaf out and set out apple pest traps two weeks before bud break.  Weed and amend all your beds now while it is cool and moist.

Finish planting fruit trees, shrubs, roses, and perennials.  This month is a good time to direct sow (where they are to flower)seeds of several flowers: sweet alyssum, cornflowers, carnations, pinks, poppies, stocks, rose campion, Lychnis, columbines, valerian, honesty, foxglove, snapdragons, mignonette, larkspur, kiss-me-by-the-garden-gate and four-o’clocks.  Perennials still may be divided if weather has not become too warm.  Violets can be divided after blooming and cuttings taken of pansies.  Make cuttings of chrysanthemums, gauras, Helianthus, lupines, Lychnis, Liatris, knautias, saponarias, scutellarias and veronicas.  Dahlias and tigridias may be started inside in cold climates and planted out later after frosts are over, or planted outside if the soil temperature is above 60 degrees F.

Several vegetables can be direct sown if weather permits and it is not too cold: beets, arugula, carrots, caraway, celery, chervil, chives, cilantro, dill, fennel, collards, mache, fava beans, cress, kale, Jerusalem artichokes, kohlrabi, leeks, lettuce, mustard greens, rhubarb, turnip greens, onions, pasley, parsnips, peas, potatoes, radishes, salsify, scallions, spinach and Swiss chard.  Sunflowers and tomatillos can be sown two weeks before the last expected frost.

Corn may be sown after April 15th in cool maritime northwest climates, or a week or two later in the inland and mountain areas.  Usually corn is sown about 10 days to two weeks before the last frost.  Native Americans of the Hidatsa tribe living in the Dakotas planted sunflowers first, then corn, and after frosts followed with beans and finally, squash.  Sunflowers were grown by themselves in a field, but corn, beans and squash were grown together; with corn in hills of 6-8 and beans and squash vining through.

Vegetables started last month indoors may be planted out this month: the brassicas, parsley, Asian greens, rhubarb and tomatoes; once frosts are over.

Prune established roses before bud break and seal the cuts with water-based glue or wood glue.  This prevents drilling wasps from injuring the canes.  Fertilize organically with Epsom salts, manure or compost, bone meal or rock phosphate, alfalfa meal and seaweed or wood ashes.

A few things maybe grafted now: grapes, hollies, pears, maples, pines and clematis.  Layers can be made of Cotoneaster, Cotinus, Hydrangea, Lavandula, Lonicera and Parthenocissus. 

Enjoy spring!

Starting Seeds Indoors

Standard

photo (127) photo (128)

Many of us get a good feeling from planting seeds and watching them grow when outside it is still dark and cold.  But inside, we are planning for spring planting.  We can start the varieties we want—perhaps a favorite is not available locally as a transplant or as seed; we can raise it ourselves from seed!

Most everyone I know has good luck starting seeds in a sterilized seedling mix.  It may be difficult to find an organic seedling mix; and it must be sterile or seedlings might dampen off from fungi present in the air and abundant in unpasteurized soil mixes.  A mix I make is soil free: 6 parts sterile (pasteurized)peat moss + 3 parts fine perlite + 1 part washed coarse sand.  If you are unsure if your mixture is sterile or not the mix may be heated in an oven at 160 degrees for one hour.  Do not allow the mix to heat above 180 degrees.  A mixture including compost would need to be sterilized by heating to use for seedlings.

Several types of containers might be used to start your seedlings.  In the first picture above, I used a milk carton cut laterally, providing two useful containers.  Shown are pepper seedlings.  Peat pots work well for plants that are difficult to transplant, because they minimize transplant shock and biodegrade into the soil.  Be sure to keep them quite moist once planted, because if the peat pots become too dry, roots will not penetrate the container.  Some plants that benefit from being raised in peat pots and are difficult to transplant are: portulaca, nasturtiums, sunflowers, poppies, eggplant, squash, cucumbers, melons and pumpkins.  Peat pellets also work, but they sometimes are so hard that roots have difficulty growing in them.

Timing is another important factor in raising seedlings.  Your transplants should be big enough to mature and produce in your season, but not too big, or they will not take off well and will take up a lot of room in the house.  Here is a basic seed planting guide, categorized month-by-month, of which seeds to plant at what time for success in northern climates of 100 to 170 days.  (Adjust timings to your local climate):

In January plant impatiens, begonias, geraniums and salvias.  Late January or early February is a good time to start eggplant, peppers, onions, petunias and pansies.  March is probably the best month to start cole crops (brassica family).  April is a good time to start tomatoes and balsam; late April or early May for pumpkins, squash, melons, cucumbers, and nasturtiums.

Florescent grow lights with an adjustable chain are a great help in starting nice seedlings; the lights can be lowered with the chain to keep the newly emerged seedlings in bright light.  This will prevent your plants from getting “leggy”.   Temperatures vary for germination: cole crops about 65 degrees, onions about 70, tomatoes about 75 and eggplant, peppers, squash, melons, cucumbers and nasturtiums about 80 degrees.

Make sure your seedling mix is not too wet.  Some seeds like to germinate on the dry side, such as tomatoes and peppers.  I cover my newly-planted seeds with plastic wrap, but check them twice daily for moisture and rotate them if necessary.  Once the seeds are just up, I loosen the wrap (a little more each day) to harden the babies off to the air.  Grow your plants on in cooler conditions than you germinated them and they will grow stockier.  A cold frame is just about the best place you can put them if it is not too cold outside.  In a south-facing cold frame the soil will remain warm at night, and daytime venting will give the plants fresh air.  Keep shade cloth handy if it tends to get too hot during the day in your area.  This is a common occurrence in dry, sunny climates with warm days and frosty nights.  The second picture above shows newly transplanted seedlings in a cold frame vented for the day.  A cold frame will harden-off your plants before planting out.  Don’t forget to place open-ended containers around plants as you place them in the garden to deter cutworms.  Good luck!

Some More Heirloom Early Spring Flowers

Standard

photo (115) photo (116) photo (117)

I have several more wonderful heirloom flowers blooming here in Oregon in late February.  Tulipa schrenkii is shown in the first photograph.  It was introduced into Europe in 1608 from Turkey and is rare today.  The rather pointed petals are a warm red, margined with golden orange.  John Parkinson described and illustrated this tulip (though botanists have changed its name) in his great work A Garden of Pleasant Flowers, published in 1629.  He calls it “Tulipa pracox rubra oris luteia.  The early red tulipa with yellow edges, or the Duke.”  This species was an ancestor to the ‘Duc van Tol’ tulips, which were developed to be forced into bloom and sold, during the seventeenth and eighteenth centuries.  Tulipa schrenkii is hardy in USDA zones 3-9.

Tulips are fairly easy to grow.  they prefer sandy or light soil, full sun, and a dry summer.  If you live in an area with rainfall in summer, you can dig them and store them in in netted bags or open boxes until October, then plant them again.  The bulbs will increase under such treatment.  I cover my bulbs with poultry netting to discourage cats from scratching the bed and squirrels from digging the bulbs.

The beautiful. fragrant Narcissus orientalis known in the nursery trade as ‘Grand Soleil d’Or’ is illustrated I’m the second picture above.  This plant is illustrated in Parkinson as well, labeled ‘Narcissus Africanus aureus major.’  He compares it in size to the beautiful ‘Primrose Peerless’, and mentions that it is of “…exceeding sweet a sent”  (I have used the modern “s” instead of the antique “f” used in 1629).  Parkinson also mentions the “blackish brown coate or skinne” covering the bulbs.  This narcissus is forced in great quantities today and has a delicious scent.  Out of doors, it is hardy in USDA zones 8-10 and needs a dry summer as well, being native to northern Africa and Asia Minor.  I have grown this variety inside the house; in the low desert in California, and now here in Oregon (in the warmest, sunniest spot available).  It is beautiful and indispensable in my garden.

The third photograph depicts Vinca minor or periwinkle, just beginning to bloom here.  It has been grown since Roman times and Pliny refers to it as Pervinca.  Chaucer used the spelling “Pervinke”.  The plant is a vining groundcover with evergreen leaves and lovely blue flowers.  Periwinkle loves part shade and a moderate amount of water.  A white form exists, as  well as a double blue and a plum-colored single.  Vinca minor is hardy in USDA zones 4-10.

An important feature of these three plants is that they can be grown with moderate water, an important factor in the increasingly dry climate of the U.S.

SCENTED GERANIUMS (PELARGONIUMS)

Standard

photo (106) photo (107) photo (108) photo (109) photo (110)

Scented plants were extremely popular in the sixteenth through nineteenth centuries.  People grew them in their gardens and on windowsills.  Today, bright colorful flowers hold the public’s interest and we do not often see plants grown primarily for their fragrance.  Scented geraniums (botanically classified as Pelargoniums), while not as showy as their modern hybrid cousins, the zonal (P. x hortorum) and Martha Washington (P. x domesticum) geraniums, are delightful and charming.  The scented varietes are attractive, easy to grow plants that release their fragrance when touched.

Scented geraniums are native to coastal South Africa.  The first plants to arrive in Europe were brought by Dutch traders in the sixteenth century.  Several species exist in the wild and hybridization has taken place over the long time since they were brought into cultivation.  The second picture from the top, above, is of P. graveolens, known as ‘True Rose’.   It dates to 1787 and is one of the oldest still grown today.  It has a healthy, robust habit and delightful rose scent.  ‘Grey Lady Plymouth’ is illustrated in the third photo from the top.  It dates from 1802 and is a P. graveolens hybrid with a rose, fruit and spice scent.  Its leaves are beautifully cut and margined with a thin white line. The very rare ‘Skeleton Rose’, also known as ‘Dr. Livingston’ is another old P. graveolens hybrid from the nineteenth century or earlier, with beautiful, deeply cut lemon and rose-scented foliage.  This variety seems to prefer soil with a lower pH (more acidic) than the others.  The top photo shows foliage and flowers of ‘Fair Ellen’ an old hybrid of P. quercifolium  and has, as you would expect from the Latin name, oak-shaped leaves, scented of rich fruit and spice.  The bottom photo shows potted scented geraniums wintering on a cool porch.  The plant on the right is ‘Skeleton Rose’.  On the left is the rather large velvet-leaved P. tomentosum known as ‘Peppermint’.  It has a true mint scent.  This variety is the most sensitive to heat and is the first to curl its leaves and wilt if it is in too hot a location.  Many more species and old hybrid scented geraniums exist, but they are hard to find.  I am collecting them as I come across them (and when I have the cash to buy them).  Many scents and hybrids were once available, including: apricot-scented, nutmeg-scented, filbert-scented, spice-scented, lemon-scented, apple-scented, almond-scented and orange-scented.  Louse Beebe Wilder, in her wonderful book ‘The Fragrant Path’, reprinted as ‘The Fragrant Garden’, mentions a person she knew as a child who owned a collection of over 100 varieties of scented geraniums.  In her book, she lists 18 species and hybrids still available years later— in 1932.  She complained that many had disappeared or were very hard to find.  This seems true today, though plants are available from two sources that I can recommend: Logee’s Greenhouses http://www.logees.com and Select Seeds http://www.selectseeds.com.  Both of these sources are in the eastern U.S.  Seed for scented species can sometimes be sourced; this season I have started seeds of P. grassularioides, the coconut-scented geranium.  Seed came from Terroir Seeds htpp://www.UnderwoodGardens.com.

Scented geraniums are not difficult to grow. They prefer a somewhat cool, sunny atmosphere and a medium level of humidity.  A sunny south facing window on a cool porch is very much to their liking in winter.  That season is a rest period for the plants.  Do not water them very much in winter, but let them almost wilt; then water.  I make an organic soil mix with compost, bone meal, greensand, wood ashes and sharp sand or perlite (1/4 to 1/3 part of the potting mix, for excellent drainage).  My plants really like this mix and I never need to fertilize.  In early spring growth begins and picks up speed into summer, so watering is increased.  It is best to let the plants become nearly dry— avoid overwatering.  During the heat and bright sun in summer, some of the plants may begin to flag, so it is best to put them in an east window or provide light shade and a cooler location.  I repot my scented geraniums once a year, unless growth warrants additional repotting.  Otherwise, it is best to do so in summer.  Softwood cuttings can be made anytime from April through July.  If a plant is repotted in early autumn, cuttings may be taken then also.