THE EGYPTIAN BLUE WATERLILY

Standard

Top picture: A nineteenth century hand-colored engraving of the Egyptian Blue Waterlily Nymphaea caerulea.

Middle Picture: A photograph of the blue waterlily.

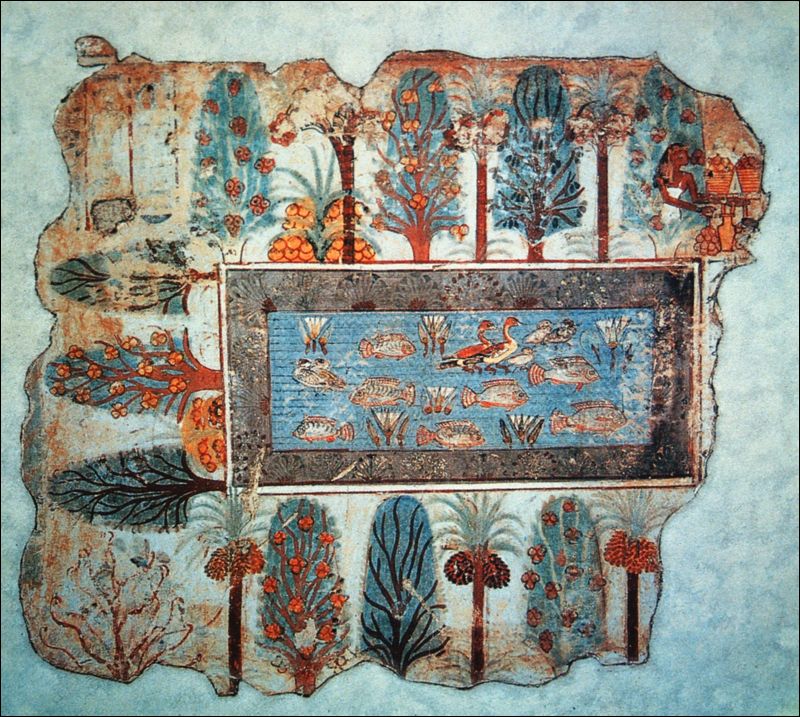
Bottom Picture: A wall painting of an ancient Egyptian garden from the tomb of Nebamun from the New Kingdom Period, about 1350 B.C.

THE BLUE EGYPTIAN WATER LILY


The blue water lily is native to the Nile River delta and Nile tributaries.  It is truly an heirloom plant as it has been known for more than 4,000 years.  Representations of the blossoms appear in Old Kingdom Egyptian paintings and carvings of the period 2686-2181 B.C. and are depicted in Egyptian art through the Roman period to about 400 A.D.  A wall painting from the New Kingdom period from the tomb of Nebamun dating to 1350 B.C. shows an Egyptian garden with date trees, grape vines and a square pool filled with fish and flowering blue water lilies.  Presumably, the gardener either moved wild plants into the garden or started them from seed. The painting is evidence that blue water lilies were cultivated in gardens 3,360+ years ago.

Sometimes the blue Egyptian water lily is referred to as the “blue lotus,”  but this is incorrect; lotus belong to the genus Nelumbo, while the true Egyptian water lily known to the ancients is Nymphaea caerulea, a true waterlily.  

The ancient Egyptians regarded the blue water lily as a symbol of creation.  In the ancient mythology, the blue lily was the first object to emerge out of chaos.  It was associated with the sun god, Ra, who emerged from the blossom in morning and retreated to it at night.  This parallels the habit of the flowers, which open in the morning and close in late afternoon. The ancient Egyptians cut blue lily flowers and wove them into wreaths, garlands and necklaces and to be placed in tombs.  King Tutankhamun’s body was covered with blue lily blossoms when his tomb was opened in 1922. In tomb paintings from Old Kingdom period until the Roman period we see people wearing, carrying and sniffing the flowers. Indeed, the flower is very fragrant, with a heady, rich scent unlike the aroma of any other.  

Another interesting attribute of the Egyptian blue water lily is that it has psychoactive properties.  The flowers contain apomorphine, nuciferine, nupharine and nupharidine, plus alkaloids. There is an ongoing contemporary conversation among archaeologists as to whether or not the ancient Egyptians new of the mildly narcotic effects of the blue lily. It is probable that they did, because lily flowers are often shown (in ancient Egyptian paintings and carvings) with symbols for poppies and mushrooms, both psychoactive plants. In pictures and carvings blue lily blossoms are shown sitting on top of and twined around wine jars.  The effects from consuming tea made from boiled flowers or wine in which these flowers have been soaked are mildly sedative, mood-enhancing and euphoric. Many ancient civilizations or cultures used various herbal substances in ritual, initiation, and other ceremonies.

Today, the blue Egyptian water lily is a critically endangered plant in its original, native habitat of the Nile delta.  The decline of this beautiful native plant is due to pollution from nitrogenous fertilizers and phosphates combined with the changed flood effect of the Aswan Dam, which has reduced the seasonal cycle of the river’s inundation.  The annual flood brought with it new, fresh soil and clean water. Organic agriculture over a period of more than 4,000 years preserved the habitat of this plant, but the use of modern chemical fertilizers and the effects of the dam have brought it to near extinction just since the mid 1960s.  A few nurseries in the world today grow plants of Nymphaea caerulea today and a few offer seeds.  If you plan to purchase seeds, read the description carefully.  Another species of Nymphaea, the South African blue waterlily, N. nouchali var. caerulea (N. capensis) is sometimes confused with the true Nymphaea caerulea.  

I have grown Egyptian blue water lilies from seed and from purchased rhizomes.  I grew the plants in large tubs in the desert climate of Palm Springs, California.  Nymphaea caerulea is considered a tropical water lily, hardy in USDA climate zones 10-12, or anywhere Citrus are grown.  Plants grow in still, warm water of at least 70 degrees F.  

If you purchase plants, pot them in a moderately rich organic loam and clay soil mix in a lily crate (a webbed type of pot) about 12” x 12”.  Place the rhizome at a 45 degree angle but with the growing point slightly above the soil level. Mulch the pot with about ⅓ to ½ inch of pea gravel, to keep soil in and keep water clear.  Place the pot so it is in at the very least 9-12 inches of water, but no deeper than 16 inches over the rim. Add oxygenating plants and an air pump if desired, to keep water fresh. Fish, especially small ones, can be kept in the same large tub or pond.  They will eat mosquito larvae if they appear. If you do not have fish, you will need to check frequently for mosquito larvae and use mosquito rings (Bacillus thurigensis israeliensis) to control them.  It appears from ancient wall paintings that the Egyptians kept fish in their ponds with the blue lilies.  The leaves of the blue lily float on the surface of the water, while the flowers are held above water on stems.  Flowers can be cut and will fill a room with fragrance. A few drops of candle wax will keep the flowers open, if dropped around the stamens.

To start Nymphaea caerulea from seed place seeds in a low bowl with sand in the bottom in a warm, sunny place (or under lights 14 hours each day).  The optimum water temperature for germination is 73 to 81 degrees F. As with many species of plants, seed germination rates vary.  I have had seeds germinate within a week, or had them take as long as 4 weeks. Grow your plants on in water until about 2 inches tall, then pick them up by the leaf and pot them into 3 inch pots in a mix of 1 part loam to 1 part clay.   Pure clay cat litter without anything added makes a good clay element for the soil mix. The depth of water over the leaves has to be gradually increased as the plants grow. When stems stick out of water 2 or 3 inches re-pot again into 6 inch pots with about 4 inches of water over the rim by now.  As the plants grow, the depth can be increased to between 12 inches and 16 inches. The plants grow and bloom best in full sun, with afternoon shade in the desert in summer, when the temperature is over 105 degrees every day.

As the blue waterlily is a tropical plant, it will need to be lifted in fall, before first frost. Put the pot in a dark, cool place that will not freeze. A dark basement 50 degrees to 60 degrees F. is excellent.  Let the pot dry for several weeks, then carefully remove the rhizome and wash it.  Place the rhizome in damp sand or peat moss and keep it in the dark in the same temperature range until spring.  The rhizome can be re-potted in a fresh soil mix before planting out again in a pond, pool or large tub with water at least 70 degrees.

I found the Egyptian water lily to be a well-adapted plant here in the low desert.  I attempted to grow true lotus, Nelumbo species, but it resented the desert’s alkaline soil and water.   But the blue water lily of Egypt, Nymphaea caerulea, is adapted to the heat and alkalinity and thrives in those conditions.  

ALOE VERA, AN HEIRLOOM PLANT EASY TO GROW ORGANICALLY

Standard

IMG_0106

A note to readers: I apologize for the hiatus in writing this blog; the organic greenhouse/nursery I managed closed its doors and I embarked upon a new life adventure. I now work as a Collections Gardener at The Living Desert Zoo and Gardens in Palm Desert, California. There, I am helping to preserve, protect, and propagate rare and ubiquitous plant species from deserts of North America, Africa, Arabia, Madagascar and Australia. I am involved in the conservation of plant and animal species facing extinction. I will continue to contribute to this blog about heirloom plants grown organically. Organic gardening is part of the best future for our planet; organic gardens actually directly capture carbon rather than indirectly and directly release carbon into the earth’s atmosphere. I urge you to do your part to capture carbon and minimize emissions. Together we can save Earth for future generations of all life forms!

ALOE VERA, AN HEIRLOOM PLANT EASY TO GROW ORGANICALLY

By James Sagmiller

Aloe vera is one of our oldest cultivated plants and was primarily grown for use as a medicinal plant. It is mentioned in the “Ebers Papyrus” dating to the 16th century B.C. in Egypt. It was well known by the ancient Greeks and Romans. In Alexander the Great’s time, about 330-360 B.C., a center of cultivation was the island of Socotra in the Indian Ocean and about 240 miles from the Arabian Peninsula. (Aloe vera is carefully illustrated, described, and its uses listed in a herbal written by Dioscorides about 78 A.D., De Materia Medica. It is known to us through a copy included in the Codex Anicinae Julianae of 512 A.D. Dioscorides recommends Aloe vera be used topically for coagulating blood, staunching wounds and for hemorrhoids. He suggests mixing it with wine and honey to use as a rinse for tonsils, gums and sores of the mouth. He says it may be ingested as a “purgative” (laxative). He states that the plant was grown in India, Arabia, Asia, Apulia (Italy), and Andros.

Our illustration above is from The Greate Herball of Gerard (1633 revised version) page 507. The plant on the left is Aloe vera, on the right is Agave americana, a plant often confused with various species of aloe. Gerard repeats the medical uses of Dioscorides, but adds that Aloe vera, when ingested will cure worms also. It is interesting that Gerard recommends hanging live aloe plants from the ceiling, mentioning it will stay alive for months. In cottages in England at that time the warmest area (and probably least prone to frost) in a house would have been near the ceiling.

Indeed, Aloe vera is a tender plant in northern climates. It is actually hardy to about 25 degrees F. when it is grown on well-drained, dryish soil. Plants are commercially grown today in the West Indies on islands such as Curacao and Barbados. The old, incorrect name Aloe barbadensis may derive from the assumption that the plant originated in the West Indies, but Aloe vera is thought to be native to the Arabian Peninsula or possibly North Africa.

Medical use of Aloe vera today is quite controversial, according to the Natural Medicines Comprehensive Database (NMCD). Topical use is generally accepted as safe for use in cosmetics and for burns, sunburns, wounds and mouth rinses. Most of the controversy concerns ingestion of  Aloe vera for various ailments, such as psoriasis, weight loss, constipation, HIV/AIDS, and Herpes simplex. Results of several studies are conflicting, so it is advised to ingest Aloe vera with caution and awareness of risks involved. Aloe vera as ingested is not recommended for lactating women, or within two weeks of surgery, and will react toxically with the drug Digoxin.

I personally have found the fresh, live juice to help heal sunburns and other burns quickly. The fresh gel acts as a moisturizing, protective layer on the skin. The fresh juice contains vitamins C and E plus various minerals. It may be that Aloe vera is most effective only when fresh and “alive” and may change chemically and in effectiveness when dried, pasteurized, or otherwise processed, much as is the case with fresh, as opposed to processed garlic.

Fortunately, Aloe vera is easy to grow! Plants produce prodigious stemless offsets which can be easily used to produce new plants. Take offsets and place them in a shady spot in a temperature of between 60 degrees F. and 90 degrees F. Let them dry off for two or three days, then prepare to pot them up. An organic cactus mix will work, but should not be too alkaline (high pH). If that is used, mix 2 parts cactus mix + 1 part organic potting soil + 1/3 part perlite + 1/16 part coffee grounds + 1/16 part bone meal and mix all together. To make your own organic mix, use 3 parts organic potting soil (or organic compost plus rotted bark or peat) + 1 part sharp grit (such as #2 chicken grit) + 1/16th part bone meal. A clay pot is really best, as the roots of Aloe vera need air. Try to think of a plant’s roots as its lungs. It needs a moist, airy environment to survive. A plastic pot may be used for an aloe plant, but place gravel or perlite in the bottom ⅛ of the pot for drainage. Make sure the pot has drainage holes for excess water to drain away. A mulch of rock chips or grit is excellent and attractive around an aloe plant, and serves to hold new offsets in place until well-rooted, but is not necessary. Room (or greenhouse) temperatures of 65 degrees F. to 90 degrees F. are preferred for this aloe. Aloes grow faster with more light and heat.

Plants can be grown in full sun as we do here outside in the low desert of California’s Coachella Valley, but Aloe vera is adaptable to light shade or part shade and fine plants may be grown in lower light conditions. Just be sure to take care not to over water your plants in shade or dark rooms. The best indoor plants I have seen were grown in east or southeast-facing windows.

Once a year, in mid-spring, top dress your potted plants with bone meal and a thin layer of fresh compost, or repot them one pot-size up.

It is great to have fresh Aloe vera on hand for burns and minor cuts, and the plants are quite beautiful with their blue-green foliage. In full sun, the foliage turns reddish. If lots of light is available, your Aloe vera will bloom with stalks of lovely yellow flowers that attract hummingbirds.

A RECONSTRUCTED HUERTA FOR MISSION SAN FERNANDO REY DE ESPANA

Standard

IMG_6605IMG_6601IMG_6597IMG_6596IMG_6592

A RECONSTRUCTED HUERTA FOR

MISSION SAN FERNANDO REY DE ESPANA

SAN FERNANDO, CALIFORNIA, FOUNDED 1797

By James J. Sagmiller


HISTORY

During the period of Spanish exploration of North America (1542-1769) and the Spanish Colonial period (1769-1821) the area we presently call California was known as “Alta California,” which translates to “Upper California.” Baja California, or “Lower California” retains its original name today. The policy of the Spanish crown was to establish Catholic missions to convert native peoples and exploit them for labor. Priests were sent out in pairs, usually with regional support of the military. The first successful, permanent mission in the area was founded in Baja California: Mission Nuestra Senora de Loreto Concho, on Oct. 9, 1697 by Jesuit priests. The king of Spain expelled all the Jesuits in 1768, responding to rumors they had become too powerful. The Jesuits were replaced by Franciscan friars who, as part of the philosophy of their order, are required to take a vow of poverty. Around this time, the Spanish crown decided to establish missions and develop ports in Alta California. Mission San Diego Alcala was the first of these, founded July 16, 1769.

FOUNDING THE MISSION

Several criteria were important for a successful mission: fertile soil, water available for irrigation and drinking, standing timber for building, and a native population that could be converted to Christianity and used for labor.

Mission San Fernando Rey de Espana was founded September 8, 1797 by Padre Fermin Fransisco de Lasuen. It was the seventeenth of the missions founded in Alta California. A man named Francisco Reyes already had a ranch at the site of the mission and it was worked with Native American labor. He decided to donated his land to the church. At an elevation of 1,100 ft., with reliable spring water, a mild coastal climate and twelve inches of rain a year, this was an excellent place to start a mission. The native population originally were hunter gatherers who exploited the rich flora and fauna of the area. Several tribal groups lived nearby, but the two most numerous were the Gabrielino and Tataviam Indians.

THE SITE

The site plan of Mission San Fernando Rey de Espana was of a design typical for Spanish missions. The main focus of the mission complex was the chapel, with its rectangular central nave with altar, and a bell tower adjacent. Other buildings, mostly workshops, were arranged in the pattern of a quadrangle around a large patio (now known as the East Garden).  A soldier’s quarters were located behind, next to the chapel, and a cemetery to the north. A building designed as priest’s quarters and for guest lodgers was the well-known and much-photographed structure with an arched arcade known as the “convento.” The arrangement of buildings in the compound was designed for efficiency but also for protection from bandits, wild animals, and livestock. Irrigated gardens benefited from this protection and were convenient to the kitchen.

The buildings at the mission were built of adobe bricks, made from a mixture of mud and straw and had very thick walls made to support heavy beams and tile roofs. Pine logs were used for beams and the rafters made from sycamore. Eaves were very wide, to protect the adobe from rain.

ECONOMICS OF THE MISSION

The mission was, of necessity, primarily self-sufficient. Natives were trained in many trades, including: blacksmithing, farming, ranching, carpentry, weaving, leather-making, brick-making, and soap-making. Wine was made from grapes and olive oil as well. By 1804, 1,000 Native Americans lived and worked at Mission San Fernando Rey, producing hides, fine leatherwork, tallow, soap, cloth, and wine as well as all the crops needed to support so many. By 1819 there were 12,800 cattle, 7,800 sheep, 176 goats, 45 pigs, 144 mules, 780 horses. The mission was a popular resting place for travelers on El Camino Real (the Royal Road).

HISTORIC MISSION GARDEN

Every mission had to produce as much food as possible to feed its large labor force and create a reserve to act as insurance for famine. Each of the missions planned extensive gardens. These gardens were not the primarily ornamental ones we see today at the missions, but were subsistence gardens of vegetables, fruit, herbs and flowers, all grown together. A garden of this type was referred to as a “huerta.” A literal translation would be “orchard garden.” These gardens looked quite different than modern gardens. They had geometric beds set into dirt or gravel paths, filled with plants grown together in a practical fashion, watered by flood irrigation from “acequias,” small irrigation ditches of gravity-fed water. There was no lawn grass. Everything grown was used for some purpose, such as for food, medicine, dye, cosmetics, wine, or oil.

MISSION GARDENS TODAY

An early photograph shows the East Garden in a ruined state before the workshop buildings were reconstructed. A fountain was originally in the center of the garden, but it was moved about 30 feet to the west and the original design of the garden obliterated as the workshop buildings were rebuilt. What we see now in the East Garden are cement paths set into grass, with various hedges and shrubs, and olive, pine and palm trees. I am presenting here a design for the reconstruction of the huerta that originally occupied the space that is now the East garden, as it might have appeared circa 1804.

A RECONSTRUCTION OF THE EAST GARDEN

In my design for a reconstructed huerta at the mission, the fountain would be returned to the center of the design, with paths leading in four directions from the fountain as well as a path to each of the four corners of the quadrangle. All lawn grass would be removed, and original gravity-fed irrigation ditches, called “acequias,” would be reconstructed as well. The mature olive, palm and pine trees would be left in place, as the use of those species were very much a part of original plantings at the 1797 mission. Paths would be made of ¼ inch gravel and geometric beds would be flood irrigated just as they originally were. Every effort would be made to source seeds and cuttings of original plants known to have been grown at the California missions in the late eighteenth and early nineteenth centuries. Plants requiring irrigation were the most likely candidates to be grown in the huerta, such as fruits, flowers and vegetables.

HISTORIC PLANTS GROWN AT THE MISSIONS

Wheat, corn (maize) and barley were grown at Mission San Fernando Rey, but most probably in outer fields or dryland farmed.  Vegetables that were probably grown in the irrigated huerta and appearing on mission records include: peas, beans, fava beans, cabbage, lettuce, asparagus, onions, tomatoes and chili peppers. Several fruits were grown at the mission: oranges, melons, pears, grapes, pomegranates, apples, quinces, plums, peaches, apricots, figs, olives, avocados and watermelons. Wild plants were also used at the mission. Presumably the Native Americans introduced the padres to them, for they are an excellent, readily available food source. Wild plants and seeds known to have been used at the mission are: chia (Salvia hispanica), sunflowers, acorns, pine nuts, sage, tunas (the fruit of Opuntia spp. cacti), clover, screw beans (mesquite; Prosopis spp.), “nopales” (leaves of Opuntia spp. Cacti) and agave. The chia was probably brought from Mexico.

In a reconstruction of a huerta for Mission San Fernando Rey it was advantageous to consult historic documents from other, contemporary California missions. Records from Mission San Diego dated 1769, reveal that corn (maize), cauliflower, lentils and garlic were grown there. By the 1770s grapes, barley, wheat, lettuce, figs, peppers, squash and pumpkins were grown. By the 1790s, records show that apples, pomegranates, oranges were grown as well. Herbs grown at Mission Santa Barbara included: anise, basil, borage, cilantro, cumin, dill, epazote (Dysphania ambrosioides), horehound, lavender, mint, rosemary, sage, thyme, and valerian. Father Junipero Serra brought the castor oil plant to Mission San Diego in 1769 and the plant was used for its oil. Other early introductions grown at many of the missions (Padilla 1962; Streatfield, 1994) were: calla lilies, Madonna lilies (Lilium candidum), the Castilian rose (Rosa x damascena bifera), the musk rose (Rosa moschata), jasmine, pennyroyal, wild cherry (Prunus illicifolia), Peruvian pepper tree (Schinus molle), matilija poppy (Romneya coulteri), date palm Phoenix dactylifera), Canary Island date palm (Phoenix canariensis), Mexican fan palm (Washingtonia robusta) and native fan palm (Washingtonia filifera).

Utilitarian plants known to have been grown at most of the missions include: agave, cotton, flax and hemp—all used for fiber. Teasel was used for making combs to card wool. Indigo was grown for dye and palm fronds were used for roof thatching and for making brooms. The giant reed (Arundo donax) was used in ramadas to provide slatted shade. Gourds were raised to be cured and carved into bowls and spoons and cat’s claw acacia and Peruvian pepper tree were used for glue.

At Mission Santa Barbara, Tina Foss, Curator of the mission museum and Jerry Sortomme, Professor Emeritus of Santa Barbara City College have been actively restoring a huerta in the mission grounds. They have sourced several plants that can be traced to one or another of the early mission gardens. A cutting from a grape plant known to more than one hundred years old from Gypsy Canyon Winery was tested for DNA. The plant was shown through the tests to be the original ‘Mission Grape’ (known as the ‘Criolla Chica’ in Argentina,’ ‘Negra Corriente’ in Peru, and ‘Pais’ in Chile; Robinson, 1999). Another (untested) grape cutting was obtained from San Ignacio Mission in Baja California from a grape vine known to be more than 250 years old, thus dating from the time of the establishment of the missions.  Ancient cuttings of pear trees from La Purisima Mission in Baja (circa 1800) and from Rio Hondo may prove be the original pear variety ‘Padre.’

Some varieties of vegetables originally grown at the missions in the late 1700s and early 1800s are still available in commerce, and some might be sourced from other historic collections. Most of the herbs are still available; several old varieties of beans, squash and maize are still to be found, as well as lettuces, gourds, melons and chili peppers. Very few peas, carrots, cabbage, cauliflower, onions, and tomatoes have survived; however, I have sourced at least one late eighteenth or early nineteenth century variety of each of these.

DRAWINGS OF CURRENT GARDEN AND A HISTORIC RECONSTRUCTED HUERTA

The drawings I have made show: first, the original layout of structures at the mission, taken from drawings made in a survey of the site in 1933. The second drawing shows the current, historically inaccurate East Garden with cement paths, grass and the fountain moved about 30 feet east of its original location. Third, my plan for the reconstructed huerta, showing overall design of paths and beds, with the fountain restored to its central location. My fourth drawing shows a detail of one of the beds with mixed vegetables, fruit, herbs and flowers, typical of the late eighteenth-early nineteenth century Spanish Colonial style. Existing large olive, palm and pine trees have been retained as part of the reconstructed design. The fifth illustration is a watercolor painting showing what the restored huerta would look like.

BIBLIOGRAPHY

AthanasiusSchafer.com. Mission San Fernando Rey de Espana.

Glybok, Shirley, 1972. The Art of the Spanish in the United States and Puerto Rico. NY:                  McMillan.

Brenzel, Katherine, Ed. 2001. Sunset Western Garden Book. Sunset Publishing, Menlo Park, CA.

Hayes, Virgina, Jan. 23, 2007. “A Huerta for Mission Santa Barbara” Santa Barbara Independent.

Padilla, Victoria, 1961. Southern California Gardens. Los Angeles: University of Caliifornia Press.

Los Angeles County Library.org. Mission San Fernando.

Rivera, Jose A and Thomas F. Glick, 2003. Local Control and Discretionary Authority: Protecting     the Acequia Bordo. From a paper presented at the 51st Congreso Internacional de Americanistas,         Santiago Chile, July 14-18, 2003.

Robinson, Jancis, Ed., 1999. The Oxford Companion to Wine. NY: Oxford University Press.

Streatfield, David C., 1994. California Gardens: Creativity and a New Eden. New York: Abbeville     Press.


RECREATING A HISTORIC GARDEN

Standard

IMG_6496

RECREATING A HISTORIC GARDEN 

By James J. Sagmiller 

Every state in our nation has a number of historic sites.  The oldest are locations of Native American habitation dating to times before the Colonial Period—these are termed “prehistoric” rather than “historic.”  In order to recreate or restore a very early Native American garden, researchers must rely on archaeological evidence and oral traditions to determine what was grown and how it was grown. One such example is the Kipahulu Living Farm in Hana, Hawaii.  Plants grown in Hawaii by Native peoples prior to the arrival of Captain Cook in 1778 have been collected and preserved at this garden. Gardens like this are a fascinating, educational experience to visit.  Anyone seeking to recreate or restore a garden from the Colonial Period or later would be able to consult written records of various types as well as archaeology and oral traditions.   

The United States National Park Service has developed methods and techniques for the preservation, restoration, reconstruction and rehabilitation of the gardens and architecture of historic gardens.  Charles Birnbaum ((1996) has written a book for the National Park Service outlining four defining methods of approach to restoring and recreating a historic garden.  In the approach of preservation, nothing is added or taken away from the garden; what is there is protected and preserved for the future.  The William Gibbes House garden in Charleston, S.C., designed by Loutrel Biggs in 1929, has been carefully preserved in its original form to the present day.  A second approach is restoration, in which a garden is made to accurately reflect the landscape at a specific time period of historical significance. The Borroughs Plantation in Hardy, Virginia (where Booker T. Washington lived as a slave around 1860) is a good example of the restoration of a living historic farm.  Reconstruction recreates a garden or part of a garden that has since disappeared, except perhaps for the knowledge of where it was located.  This has been done at Mission Santa Barbara, Santa Barbara, CA., where the historic mission huertaor orchard garden, has been reconstructed using cuttings and seeds of plants grown at the mission in the late eighteenth century.  A fourth and final approach to a historic garden is rehabilitation, which brings elements from the past history of the site and applies them to a new use of the property—an adaptation to its use in a new way. This has been done in many places in the U.S., such as in Monterey, California where private businesses have been allowed to occupy as well as preserve historic buildings and gardens.    

There are several research processes we can undertake to restore or recreate a period garden around a private dwelling or a national historic site.  The site should be surveyed, that is measured and carefully studied.  If possible, the garden should be observed over the period of several months to a year to take note of plants that may be dormant, or not visible part of the season.  An example might be spring-flowering bulbs that appear in March, go dormant and disappear by the end of May.  The site might be studied for architectural features such as remains or indications of paths, walls, fences, fountains, irrigation ditches, and the layout of beds.  Lawn grass may grow shorter over buried paving, paths, or fallen walls.   

Early engravings, photographs or postcards are invaluable for reconstructing historic gardens to a specific time in the past.  Occasionally, newspaper clippings, garden plans and/or plant lists are available as well.  During the 1870s many counties in the U.S. published atlases of important residences in their area.  These can be extremely useful in reconstructing a garden of that time period.   

Old herbals and antique catalogs can be consulted to identify plants still existing on heritage sites.  The style of the building(s) on the property will lend information to the period of the garden, or plants still remaining after buildings have disappeared can be studied and placed in historic context.  Rose or peony plants are frequently easier to identify than old perennials, because of the greater amount of contemporary information available.  The practice of ordering plants through the mail became common after about 1850, so old nursery and seed catalogs are valuable in determining what was obtainable. Period gardening and landscaping books will inform how plants were used and often include garden plans or designs.   

It is important to recognize that gardening styles as well as the purposes and use of gardens has changed and continues to change as time passes.  California mission gardens were created for subsistence—that is, for food (grains, vegetables and fruit) and for all the materials needed for medicine, the manufacture of trade goods and fodder for livestock.  The few ornamentals included were probably used for decoration of the altar, quite unlike the gardens we see at most of the missions today, which are strictly ornamental.  A historic garden that is recreated as living history would necessarily require a good deal of research and should be maintained with the tools and techniques of the specific time period it represents. A historic garden made for a period property and lived in by a modern family could be more easily maintained with modern tools and techniques, though an approach using organic methods would be both more in keeping with historic practices and better for the planet. 

Present day organic methods are not necessarily historic, though the use of chemicals did not begin until the late 1800s.  Nicotine was used as a pesticide from the mid-nineteenth century, and Bordeaux Mixture (copper sulfate) as a fungicide around the same period.  The great increase in the use of garden chemicals began in the 1940s and so is not really a significant element in garden care before that time.   

In the coming weeks I will present some research designs for several historic gardens of various time periods, including plant lists, site plans, and maintenance techniques.       


ORGANIC GARDENING NOTES FOR SPRING

Standard
IMG_2891

GREAT WESTERN, HYBRID BOURBON

IMG_2830

DOUBLE WHITE, PIMPINELLIFOLIA (SPINOSSISSIMA)

IMG_5070

LAURE, CENTIFOLIA


ORGANIC GARDENING NOTES FOR EARLY SPRING

The ground is thawed in the valley and soon the foothills will be snow free.  As soon as the earth dries out and wet turns to moist, you can work up the soil.  Dry organic amendments can then be forked into your beds.  Organic blood meal (13-0-0) is an excellent source of nitrogen and is quickly taken up by plants.  Alfalfa meal (3-1-3) will enrich soil with a moderate amount of nitrogen, small amount of phosphorous, and a moderate amount of potash.  Ground fish bone meal (5-16-0) also contains moderate amounts of nitrogen, but is a terrific source of phosphorous.  

Well-rotted manure (usually about 3-1-1) will add a good amount of nitrogen and smaller amounts of phosphorous and potash, but adds lots of beneficial, moisture-holding organic matter.  Be careful in sourcing manure as it may contain high levels of salt (especially if sourced from feed lots).  It is safest to use one year old, well-rotted manure on food crops.  Too fresh of manure will burn crops and can contain pathogens.  In our USDA Certified Organic market garden we are only allowed to use manure from grazed land that is at least one year old; and it must be applied at least 120 days before crops are planted.   Another option is to use manure that has gone through a heat of at least 160 degrees F. for 3 weeks; this kills harmful pathogens.  Compost may be spread on a USDA Certified Organic farm or garden but it must be made only from vegetable matter—no meats, dairy products or eggs, etc.  

If you are starting a new garden bed, spread cardboard, rotted moist straw, or tarps to kill grass out.  Newspapers will dry up and blow away unless anchored by rocks or chunks of turf.  You can till right into the turf to prepare your spot, but weeds will be present and you will have to keep after them.  Try to till only once, pull weeds out, add amendments and mulch the soil until ready to plant.  Too frequent tilling destroys the structure of the soil and causes it to release carbon.

Remember that healthy organic soils are alive with microbes and fungi that help plants pull CO2 out of the atmosphere.  By gardening organically you are helping the earth to gather and store carbon dioxide.  This is exactly the opposite environmental effect of conventional gardening, which uses chemical fertilizers and often features bare soil.  Chemical fertilizers require large amounts of carbon to make and bare soil causes soil organisms to die; with the result that soils lose carbon rather than pulling carbon out of the atmosphere and storing it. 

Forest, grassland and hedgerow soils pull the most carbon from the atmosphere of any land ecosystems.  In your garden, you can help this process by setting aside areas for wildflowers and grasses, shrubs, shrub borders and shelter belts or groups of trees with wildflowers and/or groundcovers underneath.  You will be providing habitat for endangered native bees, butterflies, birds and reptiles as well as building carbon storage. 

Now is the time to start your peppers, onions, leeks, tomatoes, tomatillos, and eggplants from seed to set out in May.  Wait until late April/early May to start squash, pumpkins, watermelons, canteloupes, etc.   If you plan to set out cauliflower, cabbage, kale, broccoli or other cole crops in mid-to late April, start them from seed inside now also.   A soil free organic seedling mix can be made from: 3 parts peat, 2 parts vermiculite, and 1 part perlite.  Heat mats placed under flats will aid germination of crops that like warm temperatures, such as peppers and tomatoes.   An east facing window is satisfactory, or fluorescent lights hung a few (8 to 10 inches) inches above the flats. 

Soon containerized fruit trees, shrubs, roses, bulbs, perennials, plus annual flowers and vegetables will be available in your local organic garden shops.  This year, I have grown several varieties of Certified Organic shrub roses on their own roots, found on old homesteads here in the Mission Valley:

‘Great Western’, a Hybrid Bourbon shrub rose is a long-time favorite in our area.  This rose was introduced in 1838, named after one of the first transatlantic steam ships.  It blooms for about three weeks in late spring/early summer. The plant is tall and wide, about 6 feet tall and 5 feet wide.   The flowers are fully double; a blend of rich reds and purples, with wonderful fragrance.  My grandmother grew this rose and there are plants at the museum in Ronan.  ‘Great Western’ is a hardy, easy to grow shrub rose.  The plant spreads slowly. 

‘Laure’, a Centifolia rose from 1837, was found in Ronan, at an old home built in 1913.  It is a rather short plant, with fully double, fragrant, powder pink blooms.  It is also a once bloomer, with a flowering period lasting about 3 weeks in late spring/early summer.  The plant spreads once established, but this is an advantage if your garden has an abundance of voles.  When a young plant is put in, a vole cage could be placed around the roots, but the plant will eventually spread outward and in later years a plant with an abundance of root stems will survive vole trails.  

‘Double White Scotch Rose’ introduced in 1808, is another locally found variety.  It has pure white, double, fragrant flowers in late spring.  It is of the same rose family as ‘Harison’s yellow’ the popular, thorny, hardy yellow shrub rose.  ‘Double white is equally hardy and trouble free, and spreads on its own roots to form a beautiful large group of plants.  I have seen established plants about 7 feet tall and spreading to about 8 or 10 feet wide.

Have a great spring!


GROWING ORGANIC KOHLRABI

Standard

IMG_0862

GROWING ORGANIC KOHLRABI

Kohlrabi is a delicious vegetable that is easy to grow in the intermountain climate, yet it is  relatively unknown.  It is a form of cabbage, in the mustard family, the Brassicaceae.   It is botanically classified as Brassica oleracea var. gongylodes.   Kohlrabi is more well-known in Europe and Asia than in the U.S. and well deserves better recognition and use here.  This vegetable takes less space than other cabbage family member, is easy to grow and it is more tolerant of heat.   Insect infestations do not directly affect the most desirable part of the plant, the swollen stem.  Yes, the sweetest, juiciest part of the plant is its stem, which swells with moisture and goodness as the plant grows.  The leaves are edible also, and can be used like cabbage, but the spherical stem can be peeled and cut into cubes; or shredded; or sliced to eat fresh alone or in salads.   The stem is also good cooked and can be used in casseroles and soups. 

Several varieties of kohlrabi are available today, several of them open-pollinated heirloom types.  ‘Early White Vienna’ (55 days) has been grown since the 1850s and is probably the most popular one in gardens.  Early Purple Vienna’ (60 days) from before 1860, is a purple variant of the white.  Both types are remarkably heat and cold hardy for Brassicas.  ‘Superschmeltz’ (65 days) is a giant kind of kohlrabi with stems weighing up to 10 pounds.  This last variety can be left in the garden longer than the other two as it does not tend to become “woody”.  Consistent watering will improve the sweetness and tenderness of this vegetable.  Mulching kohlrabi with 3 or 4 inches of rotted straw will preserve moisture in the soil and will enable you to have great results with less watering, while keeping soil microbes alive.   It is noteworthy that mulched soils are living soils, with abundant soil fungi and microbes that can capture carbon out of the atmosphere.   Keep in mind that bare, un-mulched soils dry and erode, and actually release carbon rather than capture it. 

Organic production of kohlrabi is not difficult.  If you end up with an abundance of cabbage loopers and aphids, the swollen stem will be peeled and so is less affected visually by insects.  However, production will be much higher if you place row covers with breathable insect fabric over your crop and mulch heavily.   Your other Brassicas will benefit from this technique also—there will be no holes in cabbage leaves or worms in the cauliflower and broccoli.   BT, or Thuricide  (Bacillus thuringensis) can be used, but it is better for the environment to simply cover all crops rather than spray.  Insects develop resistance to BT over a few generations, so it should  be reserved for use in special circumstances.  

In Western Montana, we direct sow kohlrabi out April 21-May 1 depending on weather, for harvest in July-early August.   Plants can be started inside about March 1 to be set out around April 15, and harvest would begin in late June.  A second crop (in the same space in the garden) could be direct-seeded around July 15-Aug. 1 following the first crop’s harvests.  Some gardeners plant a new row of kohlrabi every three weeks all season long.  It is ok to plant in the same space within one season, but remember to rotate your crops year to year.  Do not plant the any members of the cabbage family in the same place they grew the previous year; in fact for the previous three years.  A four-year rotation of vegetable crops in your garden will feed your soil and reduce insect and disease infestations.

The germination temperature for kohlrabi is 40-100 degrees F. with 45-95 F. being ideal.  Germination time is usually 3-10 days.  In my experience the percentage of seeds of kohlrabi that sprout is usually low, so plant extra seed in pans or outside when seeding direct.   Water regularly, steadily, and evenly; keep moist, not wet.  Be sure to thin the plants if you direct seed, and mulch when they are about three inches high.  Pests include gophers, root maggots, aphids, cabbage worms, cabbage loopers, diamond back moths, and flea beetles.  Diseases that can appear are: clubroot, alternaria blight, blackleg, black rot, downy mildew, fusarium wilt and wirestem.  It has been shown that soils with a higher pH will reduce the chances of some diseases.  The best soil pH for Brassicas is 6.0-7.5.   Kohlrabi grows best in cool summers, but we still had a great crop last year, which was during the hottest summer any of us remember here in Western Montana. 


2017 SEPTEMBER GARDENING

Standard

IMG_5334

We have had a very hot summer this year so watch for spider mites on your garden plants, especially those in hot, dry locations.   If you have kept your house plants outside, inspect them carefully before you bring them into the house.  Check for any sign of insects or diseases and if you find any, treat with organic pest controls.  Watch for slugs and cultivate to expose and destroy grasshopper eggs.  Also, watch for corn earworms. 

Another important pest in Western Montana gardens are voles.  Wrap your fruit trees for winter with plastic tree guards so that these rodents will not strip the bark.  An effective method to protect the root ball of trees from being dug into and eaten, is to plant them using wire baskets over the roots.  Voles cannot chew through hardware cloth or into the new vole wire cages.  Caging is a safe-for-the–planet method that works for fruit trees, roses, shrubs, perennials and bulbs.  Be sure to cover the surface of the ground inside the basket edge so rodents cannot burrow down from the top.

Harvest peas, beans and cucumbers consistently in September to keep them producing.   Late in the month remove blossoms from eggplant, peppers, melons and squash in order to direct energy into to ripening remaining fruits.  Cover sunflowers from birds and pinch tomato tips.  Cultivate or hoe around cabbage, cauliflower, broccoli, turnips and celery.  Keep late maturing cauliflower and broccoli well-watered.  Plant garlic and shallots and over-wintering onion sets.  You can still direct seed a few plants for fall/winter greens: arugula, lettuce, radishes, cress, corn salad, chervil and kale. 

If you plan to grow crops under tunnels or in a cold greenhouse over the winter, plant seed (early in the month) of crops for winter use: chervil, kale, spinach, lettuce, radishes, corn salad, and winter cress.  Later in the month, from the 20th to the first week of October, plant seeds of cabbage, cauliflower and other brassicas for transplanting out into tunnels in OctoberHave winter covers ready by October 1. 

September is a good time to make new beds for growing mushrooms.  Well-rotted horse manure is excellent. 

Gather ripe seeds of any vegetables (or flowers) you want to save seed from.

Prepare beds for planting bulbs.  Sow seeds of bulbous flowers collected in summer.  Transplant peonies and lilies and dig dahlias after killing frost.  Transplant pinks and carnations (with root ball intact) late in the month and plant out any other perennials and biennials where they are to bloom.  Most perennials can be divided now and replanted where they are to bloom. 

Gather ripe fruit from apples and pears.  Remove diseased fruits and “mummies”, rake up leaves under fruit trees and destroy them (to prevent apple scab).  Prepare equipment to make cider. Prepare beds for planting fruit trees, using well-rotted manure, digging down 18 inches.  Keep strawberries free of weeds and the soil moist.  If you plan to force strawberries in winter, now is the time to take them up and pot them.  Cut a root ball out with a knife, trim off dead leaves and runners and pot into 7 or 8 inch pots.  Place them in shade and water well.  Then plunge the pots in earth up to the rim.  Take them up and into frames or greenhouse before cold weather. 

Protect ripening grapes from birds with netting or gauze; keep weeds away from plants.  If wasps are a problem, hang containers of sugar water to catch them. 

Trim branches of evergreens and walnut trees, so wounds will heal before winter.  Keep weeds cleaned out from nursery beds and plantings of young trees.  Lay down grass turf this month or plant lawn seed. 

September is an excellent time to apply an organic from of potash to your garden plants to strengthen stems and roots in order to ripen them before winter.  Kelp meal can be applied as a surface dressing and watered in or you can do a foliar spray of seaweed twice during the month of September.  Do not apply nitrogen this month as it forces growth that will surely be winter killed.


GROWING EGGPLANT

Standard

Eggplant New York Improved

GROWING EGGPLANT

Eggplant is not often grown by home gardeners in Western Montana, but a good crop can be harvested and seed saved for next year if you give it what it needs.  Eggplant is native to warm, subtropical regions in India and China where it has been cultivated for more than 6,000 years.  The botanical name of the species is Solanum melongena and it is a member of the plant family Solonaceae , which means it is related to tomatoes, peppers, potatoes and petunias.  I grow eggplant in my USDA Certified Organic garden in the same rotation group as these relatives.  (It is important to rotate your garden crops in family groups so that they are not planted in the same spot for four years or more.  This builds soil and reduces risks of disease and insects.) 

Since eggplant starts growing rather slowly, it should be started inside and transplanted out to the garden later, after danger of frost is past.  I start mine inside under lights about February 1, and grow them on in bright light.  Here in the Mission Valley, our average last frost in spring is about May 17th or so, but of course this can vary by a couple weeks each way in any given year.  Eggplant seed will germinate from 60-95 degrees F., but 75-90 ideal.  The time to germination is 14-21 days.  

Harden off your plants before setting out, giving them more and more time outside each day and more sun, for about a week.  Plant them in full sun.  I usually transplant my started eggplants about May 21 to June 1, unless it is very cold and rainy.  Eggplants will grow well under hoop row covers with open ends, because they really like heat, especially at night.  Your soil pH should be 5.5 to 6.8 for best success.  Set plants about 18 inches apart all ways.  The plants grow best when temperatures are 50–95 degrees, and 70-75 degrees is ideal.   

Protect your young plants from cutworms with jugs or cans or paper rings.  Water your plants regularly, allowing them to get just sub-moist, then water.  In my experience they seem to prefer even moisture.  Try to water early in the day only, allowing leaves to dry before nightfall.  Watch for aphids, their worst pest.  You could use fabric over hoops during summer to prevent insects.  Some other pests that might bother eggplant include: gophers; leafhoppers; cutworms, Colorado potato beetles, flea beetles, mites, stink bugs, nematodes and tomato fruit worms.  Some diseases you might encounter are early blight, late blight, tobacco mosaic, fusarium, and verticillium wilt.  An application of garlic spray early in the season and followed again with the same once a month until autumn will discourage leafhoppers, which carry and continue into fall to prevent curly top. 

To harvest your eggplant, gather when full size, while skin is still shiny and when fruit comes away from the vine easily.  If the skin has turned dull, the seeds are ripening and it is too old, but of course an over-ripe fruit is worth saving for seed for next year).  Check and pick every three days to keep plants producing.  The first eggplants should be ready about September 1.  After harvesting keep the fruit cool, above 55 degrees, in high humidity, and out of the sun.  Fruits last about 7 days. 

A variety that has been successfully grown for seed here in our area is ‘Early Black’ eggplant.  It matures 65 days from transplanting out.  Another good variety is ‘New York Improved’, and heirloom American variety from 1865.  It will be ready to eat in about 75 days from transplanting. 


MONTANA PLANTING CALENDAR FOR JUNE

Standard

JUNE GARDENING CALENDAR

Our pictures today are, from left to right: heirloom morning glory “Grandpa Ott’s”, and a seedling ivy geranium.  

This month you can transplant out tender vegetables, early in the month, after frosts.  If you have not planted your garden yet you can still purchase and transplant out tender vegetables that require a shorter season (80 days or fewer).  Cole crops, such as cauliflower and cabbage, and most every transplantable vegetable can be planted until about July 1, when you could begin to sow fall crops.  Fertilize and prune cantaloupes; watch for pests and diseases on garden plants.  Keep a watch on watering if weather is dry and hot; weed after watering as plants pull up easily. 

Vegetables you can direct sow until June 15 include: amaranth, dill, summer savory, edamame beans, chervil, early-maturing corn, NZ and Malabar spinach, carrots, cucumbers, parsnips and pole beans.  Sow successive crops all month of: lettuce, spinach, bush beans, beets, cabbages, cucumbers, onions, peas, radishes, potatoes. 

Transplant out leeks, endive, herbs, plus tender vegetables.  Some of these are: tomatoes, eggplant, peppers, cantaloupe, squash, pumpkins, watermelon.  Fertilize and prune cantaloupes; when they start to vine, foliar feed with 1 tablespoon borax + 1 tablespoon Epsom salts in 1 gallon of water.  Repeat when fruit is 1” to 2” in diameter.

Late in the month (for transplanting out for a fall crop) sow: Brussels sprouts, late variety cabbage, cauliflower, kohlrabi.  Transplant out in late August/early September (5-6 weeks, with two sets of leaves).  Grow cool, possibly under netting to prevent cabbage loopers.

Harvest: beet greens, cauliflower, cabbage, radishes, lettuce, turnip greens, onions, peas, rhubarb and asparagus.  Harvest herbs: mint, balm, lavender, sage, clary, rosemary, etc. for using fresh, drying or distilling; when just coming into flower.  Lay them in the shade or on a screen in a shed to dry. 

Direct sow tender annuals and half hardy annuals early in the month (before the 15th): zinnias, marigolds, cosmos, annual euphorbia, gypsophila, nasturtiums, scarlet runner beans, Scabiosa atropurpurea,  stocks, sunflowers.  Sow nigella (succession plant every 2 to 4 weeks until end of month). 

Finish transplanting perennial starts and annual starts.  Stake dahlias, delphiniums; mulch dahlias; check for slugs around auriculas, cannas, delphiniums, hollyhocks and hosta. 

Take up spring bulbs such as tulips, hyacinths, fritillaries, colchicums, autumn crocuses, etc., when leaves are decayed.  Carefully dig and dry them over a wire screen.  Propagate from offsets, store in cool, dry place for the summer. 

Plant strawberry runners into new beds.  Thin tree fruits after bloom so no fruit touches (this discourages codling moths); protect (cover) cherries from birds, watch for pests on fruit trees, shrubs and roses.  Wash aphids off with a force of water.  Set out apple maggot traps in early to mid-June (1 for each dwarf tree; 2-3 for each semi-dwarf tree; and up to 6 for a full-sized tree).  Scrape off bugs and apply a fresh coating every two weeks. Remove loose bark and wrap trunks with cardboard or burlap, periodically removing it to capture codling moth pupae.  During the growing season, remove branches affected by fire blight, cutting at least 6 inches below affected wood.  Sterilize tools with alcohol or a 10% bleach solution between cuts.   Set out peach borer traps by the 15th.  

Trim evergreens and all types of hedges, and be sure to water lawns in hot weather. 

ORGANIC ONIONS FOR YOUR GARDEN

Standard

Redwing Storage Onion

ORGANIC ONIONS FOR YOUR GARDEN

Onions regulate their growth by day length.  Short-day varieties grow best in the South; here in the north we grow long-day varieties of onions.   When the days reach 14 to 16 hours long, the long-day onions begin to form bulbs.   The greater amount of growth prior to bulbing determines the ultimate size of the onions, so it is a good idea to start seeds inside and grow the plants on until you can put them out in the garden.   

Start your onion seeds in early spring, in darkness, or with the seeds completely covered with soil.  A good germination temperature is about 68 degrees F.  Once the plants are up, put in bright light and grow them cool.  Keep them moist (actively growing onions like a lot of water).  Harden off the seedlings in a cold frame, or by putting them outside for a few hours each day, exposing them to longer and longer periods outside.  After they are hardened off, onions can take some frosts, so you can plant them outside, in Montana, usually beginning in mid-April. 

In your garden, put your onions in full sun, in a spot where onions have not been grown for at least four years.  (Keen organic gardeners rotate their crops so that it is four years before plants are put in the same place in the garden.  This practice builds soils and prevents a host of disease and insect problems).  The best growing temperature range for onions is 55-75 degrees F.  A soil pH of 6.8 is ideal.

If you are growing bunching onions (scallions) you can direct-seed them ½” deep at a rate of 1 oz. per 200 Sq. Ft. bed.  If soil temperature is up to 50 degrees, you can plant.  Germination time is 7-28 days.

If you are transplanting seedling onions or onion sets, transplant plants 2-3” deep, 1” apart in rows.  Mulch your plants lightly (with organic straw) when plants are about 8 inches tall, but mulch no more than 2 inches deep.  If you are direct-seeding, sow in rows 12” apart, ½” deep and thin to 1” apart, as early as possible.  Be sure to give your onions plenty of steady, even moisture.  ONIONS LIKE MORE WATER THAN MOST CROPS (More water than shallots and garlic.)

Some pests that love onions include: gophers, onion maggots, slugs, leafhoppers and thrips.   A garlic spray in May and another in mid-June will help deter insects. 

Harvest green onions when they are pencil-thick or more.  Carefully wash the roots clean.  Keep them cool, out of the sun, and store cool, with high humidity. 

Prepare to harvest bulb onions when the tops are flopped over.  First, withhold water so protective skins form over the bulbs.  If not all tops have flopped over, push them over so sun reaches the bulbs.  Wait about one week; then pull them up.  Cure them in an airy shed or garage at about 75 to 85 degrees F., leaving the dirt to dry and fall away from the bulbs.  When dry, you can wipe off the dried soil from the outer layer of skins.  Store onions in a cool, dry, well-ventilated area, and keep from freezing over winter.