SCENTED GERANIUMS (PELARGONIUMS)

Standard

photo (106) photo (107) photo (108) photo (109) photo (110)

Scented plants were extremely popular in the sixteenth through nineteenth centuries.  People grew them in their gardens and on windowsills.  Today, bright colorful flowers hold the public’s interest and we do not often see plants grown primarily for their fragrance.  Scented geraniums (botanically classified as Pelargoniums), while not as showy as their modern hybrid cousins, the zonal (P. x hortorum) and Martha Washington (P. x domesticum) geraniums, are delightful and charming.  The scented varietes are attractive, easy to grow plants that release their fragrance when touched.

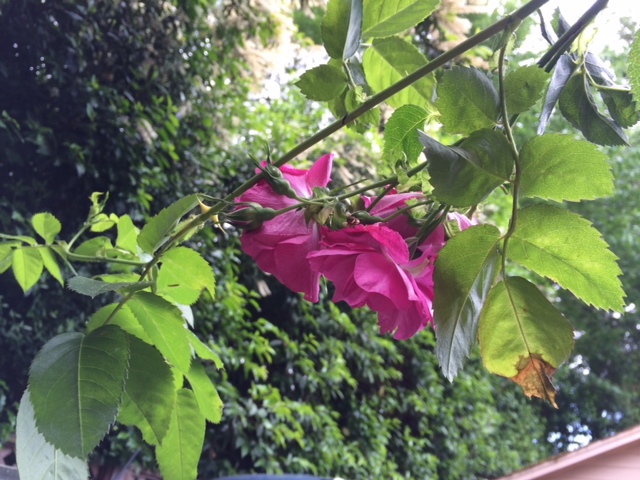
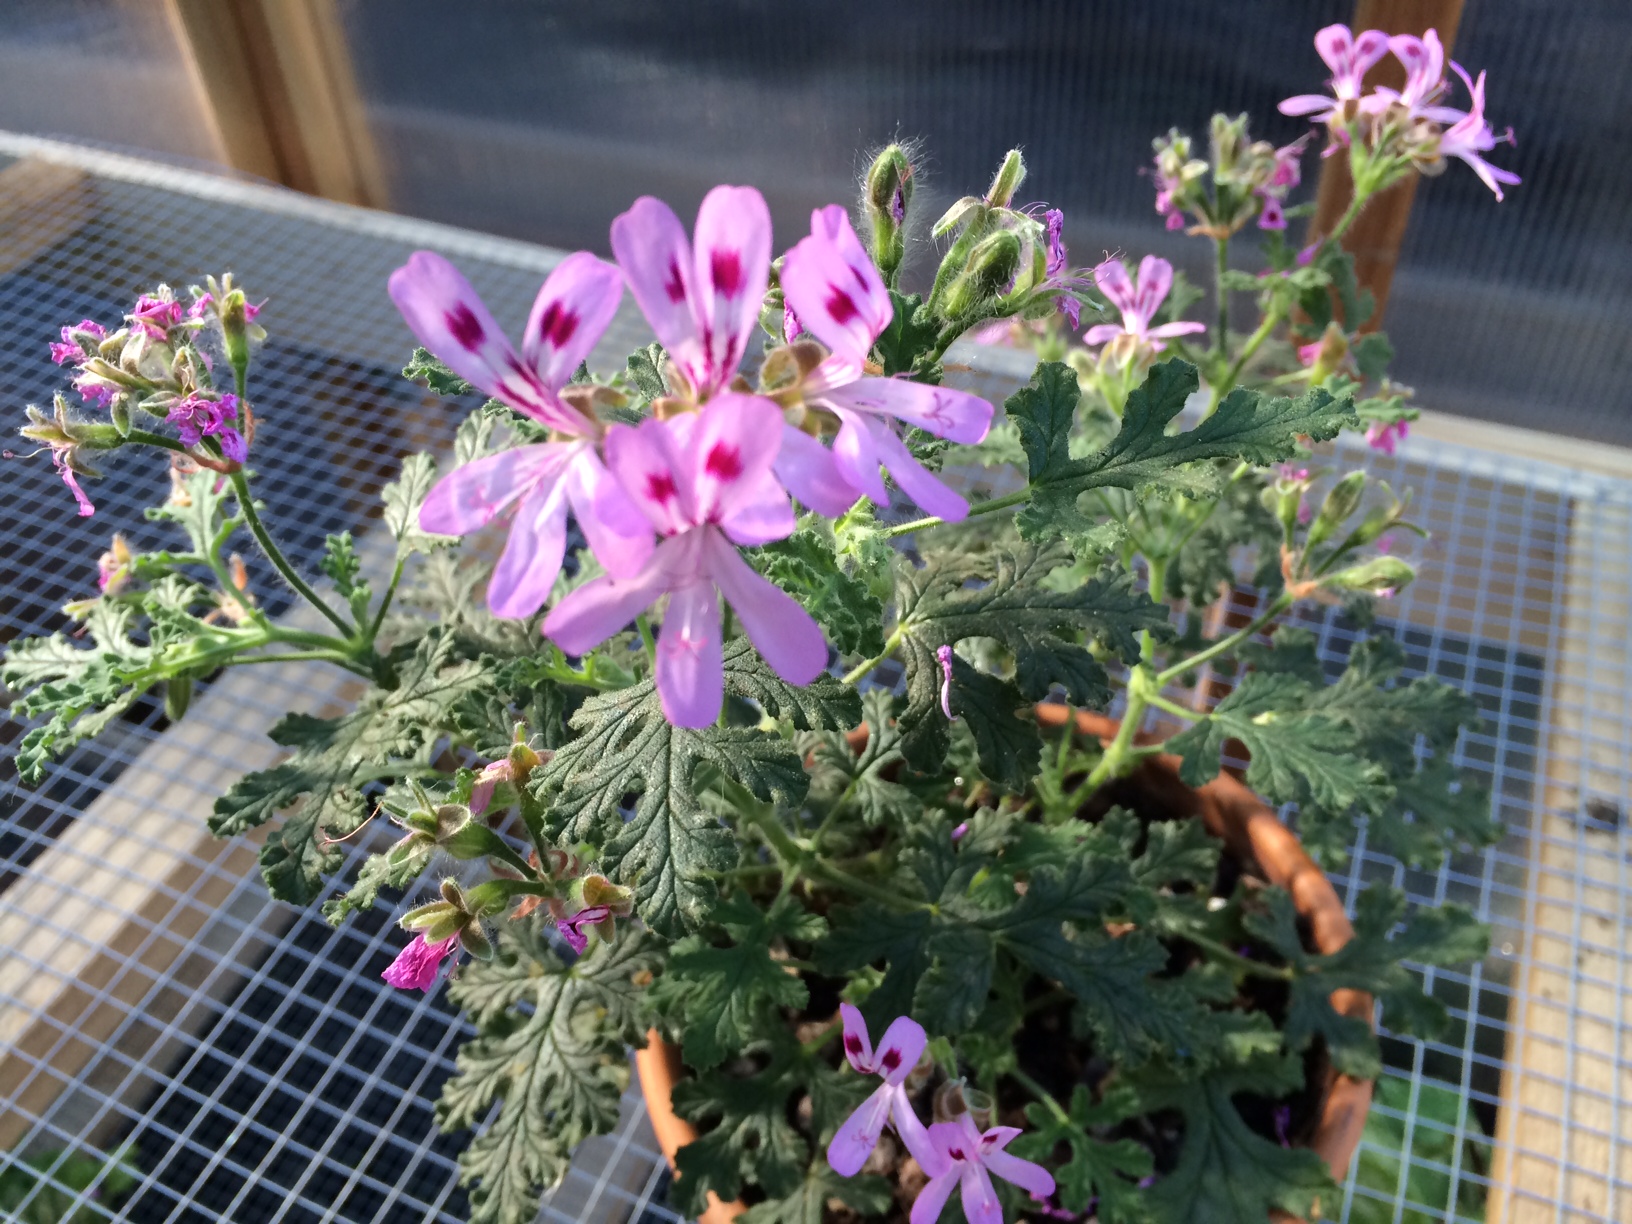
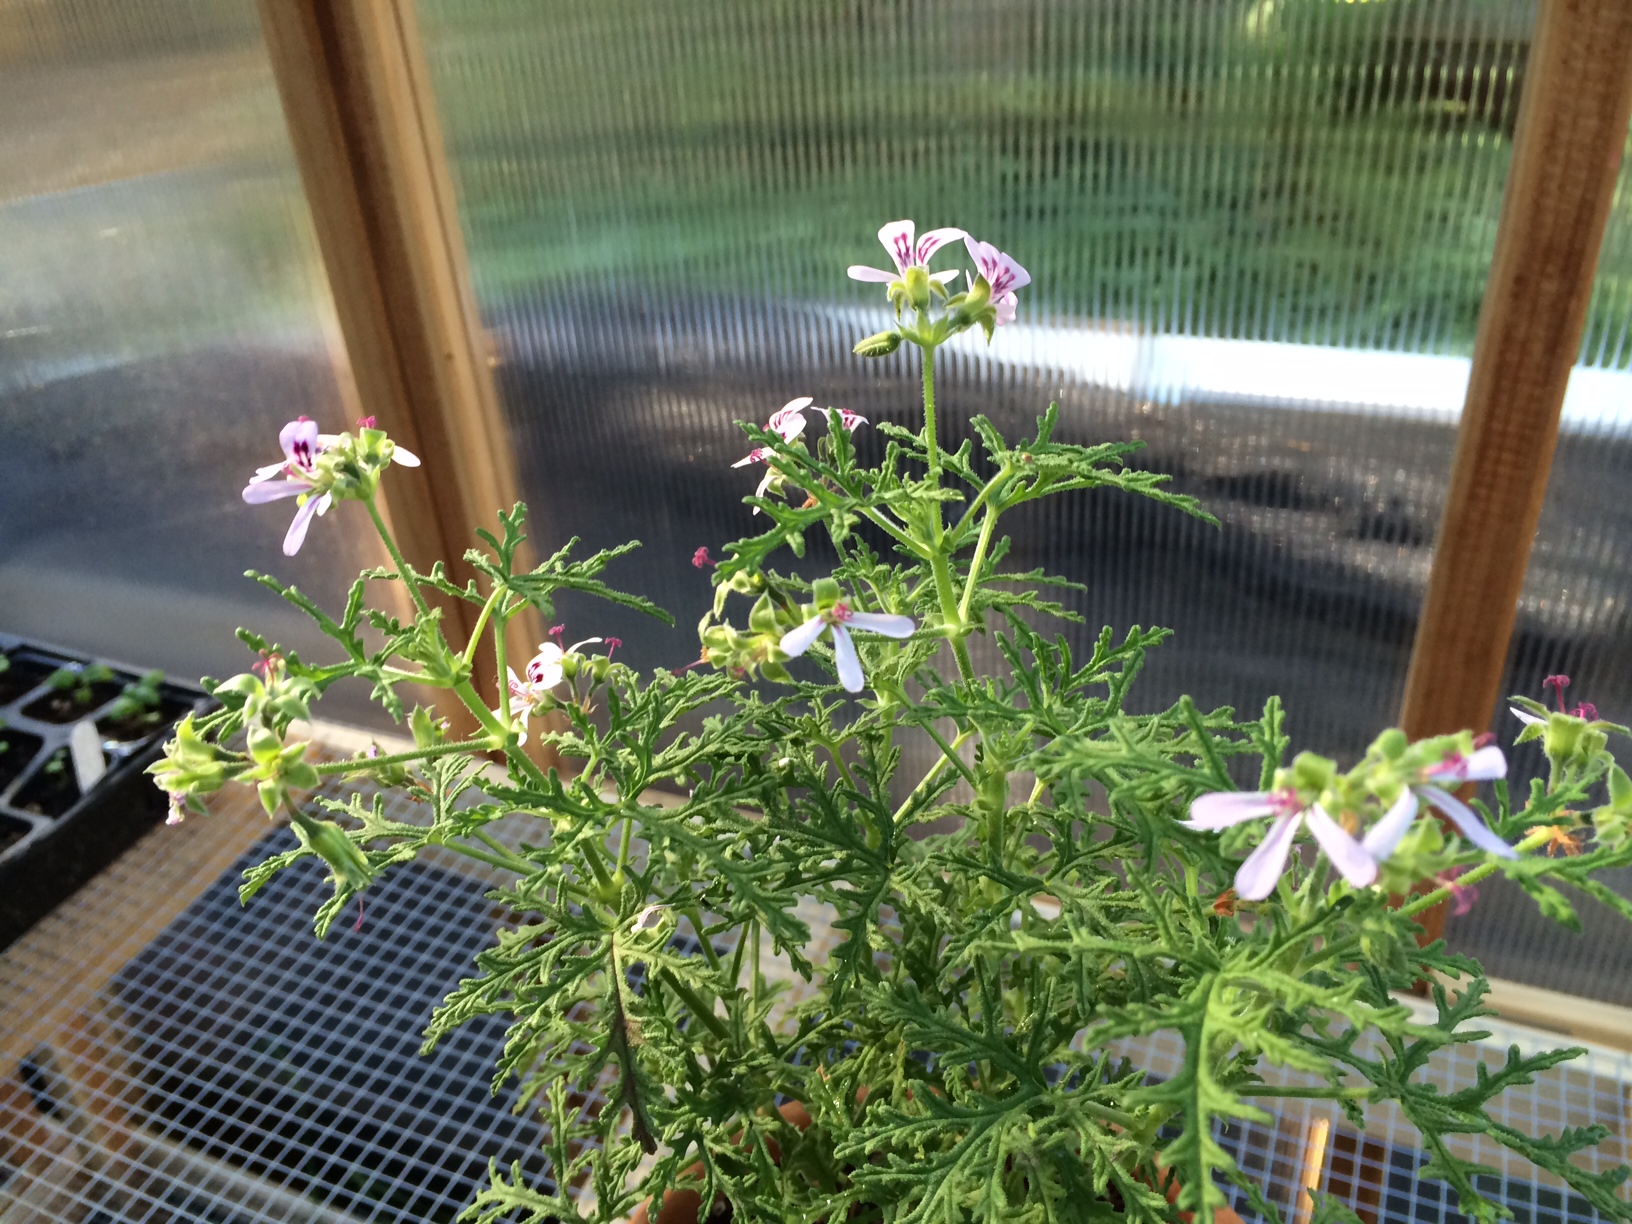
Scented geraniums are native to coastal South Africa.  The first plants to arrive in Europe were brought by Dutch traders in the sixteenth century.  Several species exist in the wild and hybridization has taken place over the long time since they were brought into cultivation.  The second picture from the top, above, is of P. graveolens, known as ‘True Rose’.   It dates to 1787 and is one of the oldest still grown today.  It has a healthy, robust habit and delightful rose scent.  ‘Grey Lady Plymouth’ is illustrated in the third photo from the top.  It dates from 1802 and is a P. graveolens hybrid with a rose, fruit and spice scent.  Its leaves are beautifully cut and margined with a thin white line. The very rare ‘Skeleton Rose’, also known as ‘Dr. Livingston’ is another old P. graveolens hybrid from the nineteenth century or earlier, with beautiful, deeply cut lemon and rose-scented foliage.  This variety seems to prefer soil with a lower pH (more acidic) than the others.  The top photo shows foliage and flowers of ‘Fair Ellen’ an old hybrid of P. quercifolium  and has, as you would expect from the Latin name, oak-shaped leaves, scented of rich fruit and spice.  The bottom photo shows potted scented geraniums wintering on a cool porch.  The plant on the right is ‘Skeleton Rose’.  On the left is the rather large velvet-leaved P. tomentosum known as ‘Peppermint’.  It has a true mint scent.  This variety is the most sensitive to heat and is the first to curl its leaves and wilt if it is in too hot a location.  Many more species and old hybrid scented geraniums exist, but they are hard to find.  I am collecting them as I come across them (and when I have the cash to buy them).  Many scents and hybrids were once available, including: apricot-scented, nutmeg-scented, filbert-scented, spice-scented, lemon-scented, apple-scented, almond-scented and orange-scented.  Louse Beebe Wilder, in her wonderful book ‘The Fragrant Path’, reprinted as ‘The Fragrant Garden’, mentions a person she knew as a child who owned a collection of over 100 varieties of scented geraniums.  In her book, she lists 18 species and hybrids still available years later— in 1932.  She complained that many had disappeared or were very hard to find.  This seems true today, though plants are available from two sources that I can recommend: Logee’s Greenhouses http://www.logees.com and Select Seeds http://www.selectseeds.com.  Both of these sources are in the eastern U.S.  Seed for scented species can sometimes be sourced; this season I have started seeds of P. grassularioides, the coconut-scented geranium.  Seed came from Terroir Seeds htpp://www.UnderwoodGardens.com.

Scented geraniums are not difficult to grow. They prefer a somewhat cool, sunny atmosphere and a medium level of humidity.  A sunny south facing window on a cool porch is very much to their liking in winter.  That season is a rest period for the plants.  Do not water them very much in winter, but let them almost wilt; then water.  I make an organic soil mix with compost, bone meal, greensand, wood ashes and sharp sand or perlite (1/4 to 1/3 part of the potting mix, for excellent drainage).  My plants really like this mix and I never need to fertilize.  In early spring growth begins and picks up speed into summer, so watering is increased.  It is best to let the plants become nearly dry— avoid overwatering.  During the heat and bright sun in summer, some of the plants may begin to flag, so it is best to put them in an east window or provide light shade and a cooler location.  I repot my scented geraniums once a year, unless growth warrants additional repotting.  Otherwise, it is best to do so in summer.  Softwood cuttings can be made anytime from April through July.  If a plant is repotted in early autumn, cuttings may be taken then also.


FEBRUARY GARDEN CALENDAR

Standard

photo (105)

My photograph above shows young heirloom perennial and biennial plants in flats and seed containers.  Now is a good time to finish repotting them so they will grow large enough to set outside when weather permits.

If your climate is mild enough, February is a good time to begin planting deciduous trees, roses, raspberries, gooseberries and currants.  Roses, fruit trees, raspberries, gooseberries grapes and currants may be pruned as well, if your climate is not too cold.  In very cold climates it is advantageous to wait until very cold weather is over and you are sure of the extent of winterkill on branches.  If fruit trees and roses are pruned too soon, they will begin to grow earlier and my be harmed by late spring frosts.  This is especially true of tender roses, apricots, almonds, peaches, prunes and grapes.  In Montana, living in USDA climate zone four, I usually waited until March to prune hardy fruit trees, and April to prune tender fruit trees and roses.  That way, one can cut off the winterkilled portion, cutting into live wood about an inch and a half.  Make sure your pruning tools are clean; a 10% bleach solution in water will sterilize the tools.  Clean tools after pruning each tree or shrub and after any cut into diseased tissue.  After pruning is finished, rinse tools with clean water, dry them and wipe them with light oil to prevent rust.  If pruning roses, do not use the pruning sealants designed for fruit trees, as they will cause die-back of canes on your roses.  An excellent sealant for pruning cuts on roses is a water-based glue that dries hard, such as Elmer’s.  Sealing rose pruning cuts will prevent cane-drilling wasps from destroying viable canes and prevents canes from drying out.

Seeds of hawthorns and large species or shrub roses may be sown outside now to make thorny hedges.  Seeds of fruit, shrub and rose rootstocks can be sown now also.  Make sure to continue to check any plants in frames and to ventilate them whenever weather permits.

If your climate is mild enough, you can begin dividing most perennials and replanting them.  Wait until July to divide German irises (Iris germanica cultivars).  Wait until August/September to divide peonies.  Many hardy annuals can be sown outside now if weather permits: larkspur, lavatera, lychnis, nigella, poppies sweet peas and kiss-me-by-the-garden-gate.  These all need cool temperatures to germinate well.

In the greenhouse you can force bulbs, strawberries, ranunculuses, pansies, violets, wallflowers, stocks, sweet williams, carnations, roses, etc.  Under lights or in a warm greenhouse several tender annuals may be sown now, such as petunias, impatiens, geraniums, snapdragons, etc.  Seeds of several cool hardy vegetables can be started in the greenhouse also, such as cabbage, cauliflower, kales, and onions.

February is a good time to spread manure, alfalfa meal, bone meal, wood ashes, and other soil amendments over vegetable beds, asparagus beds, rhubarb, grapes and vegetables still in the garden.  Do not place manure too close to grape or rose stems.  Be sure to check mushroom beds and protect them from too much moisture.  Dry straw is a good cover, and it helps to have a shed roof over mushrooms to protect them from too much rain.

In February you can finish your orders for seeds, perennials, roses, fruit, evergreen and deciduous trees.  Enjoy February!


Designing A Garden For Heirloom Plants

Standard

photo (92) photo (93) photo (94) photo (95) photo (96) photo (97) photo (98) photo (99)

Winter is an excellent time for gardeners to plan garden designs as there is minimal activity outside this time of year, epecially in northern climates.  As soon as soil can be worked you can begin executing your project.  In southern and low desert climates it is also a good time to plan your garden and build it because the cool temperatures make it easier to do heavy physical labor.

This last year I designed and built a garden in Early American style to hold my collection of antique roses, fruits, flowers and vegetables.  I had several goals: create a design based on historic models; maximize use of space and efficiency; minimize maintenance labor; use local materials, protect plants from predation and create the best growing conditions possible.  The first picture above depicts an American garden design plan from the late eighteenth century.  The original drawing is archived at the Essex Institute in Salem, MA.  My photo is taken from British and American Gardens of the Eighteenth Century, edited by Robert P. Maccubin and Peter Martin; The Colonial Williamsburg Press, 1984.  This style of design and use of space has its roots in Medieval gardens of Europe.  The plan is formal; beds are edged by timbers, are often raised or slightly raised and mud-free (and/or weed-free) paths separate beds.  This formal style is quite convenient to tend: crops can be separated and rotated; soil pH, texture and drainage can be adjusted from bed to bed, and some beds can be high water-use, while others may be medium or low water-use.  I find it convenient to place high water-use beds nearest the house and low water-use beds farthest away.

The second photo above is of my garden design for my garden in Corvallis, Oregon.  I measured the entire site, then made the drawing to scale on graph paper.  I used cut-out pieces of colored paper for structures such as the greenhouse, cold frames and porches.  I made labeled pieces of graph paper to indicate trees and shrubs.  The cut-out pieces can be moved around over the drawing until you determine where you want everything to go.  Shade is an issue in this garden, so sun-loving and shade tolerant plants were placed accordingly.

When the design was finished, trees and shrubs that cast heavy shade were removed or moved to new location; materials and workmen were sourced.  Tree and shrub roots were ground and removed.  Soil leveling was undertaken, then fences were built.  We tilled the soil, as seen in the third photo above, then raked the grass and roots into piles approximating the location of beds.  We had such a hot summer that the grass roots quickly died.  They provided immediate organic material for the soil.

We measured and drew out my design with spray paint and began to build our boxed beds.  I used 2′ x 12′ cedar lumber anchored in place with metal spikes set in concrete.  The fourth photo shows bed construction in the back yard garden.  Trenches 6 inches deep were dug to lay the timbers into.  Now we had beds raised six inches above the original soil level and 4 inches above planned level of the gravel.  This enabled us to use the native soil and amend it with 4 to 5 inches of compost, manure, greensand, wood ashes, alfalfa meal and bone meal (See the fifth photo above of the front garden).

After soil preparation, planting could begin.  The sixth photo above is a shot of the back garden two weeks after planting.  Vegetables grew quickly in the wonderful, organically amended soil.  The front garden was finished and planted a few weeks later (the seventh photo above).  The front beds were planned for bulbs, perennials and shrubs that use little or no additional water in our climate.  I do have to water the rose bed bordering the fence; watering deeply but infrequently once the roses are established.

The last photo shows one of the large 3′ x 3′ wooden tubs newly planted with ‘Blue-Podded Blauwschokker’ peas, which date to the sixteenth century.

The entire construction project took six months, from design to planting.  For a labor force we had two people working part time and one person working full time.  The garden is planted with heirloom plants dating from the ancient Greco-Roman period through the Oregon Trail Era (1830-1869).  Also included are a few more recent varieties, dating before and up to 1925, when the house was built.


IMPROVING YOUR SOIL

Standard

photo (91)

The quality of your garden soil is an important consideration in growing heirloom fruits, vegetables and flowers as soils come in a wide variety of textures and materials.  Soil texture describes the size of the mineral particles in your soil.  Soil particles in order of size, from smallest to largest, are: clay, silt, fine sand, medium sand and coarse sand.  The ideal garden soil (for most plants) is a loam soil, which carries particles of clay, silt and sand, plus organic matter.

Soil structure refers to the way soil particles bind together to form clumps.  In soils with good structure the spaces between particles are large enough to ensure good drainage but do not dry too quickly.  The best garden soil, loam soil, drains fast enough for root health but retains enough moisture for continued satisfactory growth.  Adding amendments to soils will improve its structure and provide food for beneficial microbes.

Another consideration to address before you add amendments to the soil is to test the pH— the measure of acidity to alkalinity in your native soil.  A pH of 7 is considered neutral and many plants are adapted to this condition.  A pH above 7 is considered alkaline while a pH below 7 is considered acid.  A pH test can serve as a guide to which plants you might be able to grow with ease and others that might be more difficult.  It is easier to make soils more alkaline, but difficult to acidify them.  Even though you may add sulfur or aluminum to your soil to acidify it, the subsoils beneath will remain alkaline and eventually the alkalinity will return, especially if your water is alkaline.  This makes it difficult to grow plants such as camellias, rhododendrons and azaleas (which prefer acid soil) in regions with alkaline soil and water.  Adding lime or crushed shells to acid soils will increase soil alkalinity.

One consideration in growing heirloom plants is to research soil amendment ingredients and practices used in the 19th century, as most of the plants still in existence from that era and before were selected under those soil conditions.  I am an organic gardener using these time-tested methods and believe that building your soil is crucial to long term success.  By amending your soil with such things as greensand, sulfur, bone meal, kelp meal and manure, you will enrich it and create a productive environment for soil bacteria.  You can choose from composted cow, hog or horse manure, alfalfa meal, cottonseed meal and guano or chicken manure to add significant nitrogen to your garden soil.  These all contain small levels of potassium and potash.  Bone meal, hoof and horn meal are excellent sources of potassium.  Kelp meal, wood ashes and greensand are significant sources of potash.  Greensand also contains many trace minerals.  Keep in mind that bone meal is somewhat alkaline and wood ashes are quite alkaline.  Home made compost is always valuable and usually contains a fair amount of nitrogen with smaller mount of potassium, potash and trace minerals.  Another option to improve soil is to plant cover crops and till them under.  Clover, rye, lentils, field peas, vetch and buckwheat are some examples.

This is the time of year to plan for improving your soil.  As soon as the ground thaws you can test the pH and as soon as soil becomes workable (not too wet to dig) you can add amendments.  It is important to learn as much as you can about what type of soil each plant you plan to grow prefers, for long term success.  For example, brassicas (cole crops like cabbage) have fewer pest problems and greater production in slightly alkaline soils.


Heirloom Cauliflower

Standard

photo (87) photo (88) photo (89) photo (90)

I grew two varieties of heirloom (open-pollinated) cauliflower in 2015.  The top picture shows a period illustration of ‘Henderson’s Early Snowball’ from Peter Henderson’s Garden and Farm Topics of 1884.  Peter Henderson was a market gardener farming in New Jersey during the mid-nineteenth century.  He created this variety for production in the American climate.  ‘Henderson’s Early Snowball’ was earlier to mature than any other variety at the time and a bit smaller, weighing about one pound.  Other varieties Henderson grew and recommended in 1867 are: ‘Early Erfurt’, ‘Early Paris’, ‘Half Early’ and ‘Wellington’.  By 1884 he added ‘Algiers’, ‘London Market’ and his own ‘Early Snowball’.  All varieties except the latter originated in Europe, which has a much more even climate than most of North America, so his introduction was better adapted to the wide swings of temperature in the U.S.  In 2015 I was unable to locate seed of any of the old European varieties, but this year seed of ‘Erfurter’ is being offered by Baker Seeds.  Since its maturity is listed at 55 days, it may be ‘Early Erfurt’, which dates to 1867 or earlier.  ‘Early Snowball’ matures in about 55 days from transplanting also.  It was introduced to the public in 1888 and Henderson commented that it took less growing space in the field, was more tolerant of temperature variations and was his most profitable cauliflower crop.

The second picture depicts ”Purple of Sicily’.   I have not been able to discover the date of introduction of this variety, but it reached the U.S around 1912.  It is purple in color while growing, but turns bright green when cooked.  Similar to broccoli in many respects, it is softer and more tender, like a cauliflower.  This variety is later maturing (90 days) than ‘Early Snowball’, but is more tolerant of high and low temperatures and is more insect resistant.  The heads are larger, about two to three pounds each.  I had great success with this variety it tastes as good as ‘Early Snowball’.

The third and fourth pictures above show heads of each variety after a frost of 19 degrees F.  I was surprised that ‘Purple of Sicily’ was still fine and edible after such a low temperature; while any other cauliflower would have most likely been destroyed, as was ‘Early Snowball’.

Cauliflower enjoys mild, cool temperatures.  Too high of temperatures or too dry conditions will cause it to “button”, which means the heads will only grow as large as a quarter instead of reaching full size.  In the nineteenth century gardeners grew crops of cauliflower in cold frames, timing an out of season harvest for late fall, winter and early spring.  The frames needed to be covered with mats for the night to insulate them from extreme cold.  An important consideration was to harden off the plants well before planting outside in cold conditions.  These nineteenth century methods used no fossil fuels so left a very low “carbon footprint”, an important fact in today’s warming climate.  Their methods can be undertaken today; what is required is careful timing and management.

For late spring crops, start seeds indoors in February.  When the plants have 6 to 8 leaves, transplant out into cold frames.  Plants put into frames in March can be transplanted into the open garden in April.  Hardening the plants in frames makes them able to withstand cool spring temperatures.  The plants should be ready to harvest in June, before it gets too hot.  You can direct seed in April also, for plants to mature in late June.  For fall crops, seed can be sown July through mid August, transplanted out in 5 weeks, to mature in September to October.  Adjust these timings to your climate; these recommendations are for the northwest U.S.  In climates with cool summer temperatures cauliflower can be grown well in summertime, too.  Cauliflower is not as frost hardy as cabbage or Brussels sprouts; both of those crops were still usable here after the 19 degrees night.

I will definitely grow both of these heirloom cauliflowers this year and I will try ‘Erfurter’.  I love cauliflower and feel it is worth the extra trouble to grow.  When you grow your own organically, as I do, you know it will taste great and you will reduce your carbon footprint by not purchasing vegetables shipped long distances.  Also, you are not unknowingly eating a GMO products, which we know have yet to be labeled as such.  The Baker Seeds website is http://www.rareseeds.com


January Gardening Calendar

Standard

photo (84)

On or near the beginning of each month I will present a gardening calendar.  I find that it saves time and worry if I have a ready-made plan for activities in the garden.  January is one of the least busy months of the year for gardeners, but we have a few things that need to be or can be done:

Plan your garden for the year.  Read seed and nursery catalogs and pick out what you would like to grow.  It is a good idea to plant greater numbers of the vegetables and fruits your family uses on a regular basis.  Minimize or eliminate the things you do not.  Figure out how much space you have and how much seed you need, then order.  If you are just beginning or reconfiguring your garden, January is a great time to undertake design projects.  January is also an excellent time to repair equipment, such as garden tools, plant supports and cold frames.

If you have a supply of fresh manure you can make a hotbed in which to grow early vegetables and flowers.  Though perhaps unpleasant to deal with, a hotbed provides a little microclimate that is much warmer and more humid than the out of doors.  Hotbeds will extend your growing and harvest seasons.  They are a real help in climates with short seasons and cool nights.  Squash, melons, peppers and eggplant enjoy the warm nights a hotbed will provide, thereby significantly increasing production.  In the nineteenth century most winter vegetables, such as cauliflower, were grown in hotbeds.

Carefully tend your cold frames in January, covering them with insulating materials on cold nights and admitting air during the day if it is not too cold.  Now is the time to clean debris and dead leaves out of winter lettuces and other greens in cold frames or cold greenhouses.

Early cabbage can be sown indoors, as well as parsley, cauliflower and eggplant.  Flowers to sow inside to transplant out later include: geraniums, impatiens, lobelia, petunias, pansies, snapdragons and violas.  Primroses, auriculas, delphinium and many other perennials can be sown now indoors.

Manure can be spread over vegetable beds and perennial borders.  Pruning can begin of fruit trees and raspberries.  If you live in a mild climate or have a large cold frame or cold greenhouse, you can harvest any of the following: leeks, spinach, kale, carrots, lettuce, corn salad, onions, parsnips and chard.  In a cold climate carrots and parsnips outside can be covered with straw to protect them, so you just have to push away the snow and straw to dig them.  In a cold (unheated) greenhouse greens can be grown and harvested all winter, especially if an inner layer of floating row cover is placed over the crops to protect them.  Stakes or hoops will prevent the fabric from touching the leaves of the plants.

Enjoy January!


Antique Chrysanthemums

Standard

photo (83)

More than 150 species of Chrysanthemum exist in nature.  In this article we are concerned with Asian species brought to Europe and North America as garden plants.  In ancient China gardeners selected interesting plants from the wild and over centuries developed chrysanthemums into popular garden plants.  A yellow garden variety and a white were known in China by the fifth century B.C.  By 1,000 A.D., in the time of the refined Sung dynasty, thirty-five named varieties of mums existed.  By 1700, the number had jumped to 300.

The florist chrysanthemums we grow today in America (and all over the world) are descended from wild and garden plants introduced from China.  The first species to reach Europe was Chrysanthemum morifolium, ancestor of modern florist mums.  Plants arrived in Marseilles, France in the 1780s, then were brought to England by 1790.  The flowers of this species are purple.  After 1800 more garden varieties arrived in Europe and America from China.  The yellow-flowered C. indicum arrived in England in the early nineteenth century.  Enthusiasts soon crossed C. morifolium x C. indicum to create a wide range of colors and shapes.  (It is not known how many of the diverse forms that appeared in the early 1800s were new hybrids; some may have been garden varieties received directly from China.)  By 1834 fifty varieties in several colors and shapes were available in Europe and America.

Robert Fortune introduced another Chinese species, C. rubellum, the Chusan Daisy, in 1846.  The advantage of this species and several of its hybrids is that it endures colder temperatures than the other two species.  The plants tend to be shorter, also.  The picture above (from The Cottage Garden, by Roy Genders, Pelham Books, 1969) shows several blooms of C. rubellum.  Because of the button-like shape of the flower this kind of mum came to be known as the “Pompon chrysanthemum”.   The pompon class is still recognized today by the National Chrysanthemum Society.

I once grew a beautiful pompon mum named ‘Paul Boissier’, but lost it in a move.  It grows to about three feet or more and has beautiful, double orange and bronze flowers in the lovely circular shape of the pompon mums.  Few heirloom mums survive today, and only a very few are commercially available.  Shirley Hibberd, in his book The Amateur’s Flower Garden, published in 1871, listed 100 named cultivars of chrysanthemum.  None of them is available from a nursery today!  It is probable that if some of these old named plants do still exist, they would have to be re-identified.  I am always looking for old mums, especially pompons, but have not had much success.

Today the National Chrysanthemum Society recognizes thirteen distinct classes of mums, defined by their flower shapes.  Emphasis seems to be on contemporary varieties, not on heirloom mums, but membership does expose one to the great diversity of modern mums available.  Membership is only $20.00 per year for an individual.  Youth memberships (under 17), garden club affiliation (organization) memberships, and life memberships are also available.   The website for the society is mums.org.  Two benefits of membership are a cultural manual for new members and a quarterly journal.  Why not join and voice a desire to locate, preserve and propagate antique chrysanthemums?


Antique Florist Anemones

Standard

photo (79)photo (80)photo69DCX1WUphoto (81)photo (82)

The genus Anemone is a reasonably large one with 120+ species.  Here we will concentrate on three tuberous-rooted types that are native to the Mediterranean region: Anemone coronaria, A. pavonina, and A. hortensis.  These species cross readily.  Both wild and cultivated forms have large and beautiful flowers that last well when cut.  In the sixteenth century species and cultivated anemones were introduced to Western Europe through the development of trade with Constantinople (now known as Istanbul).  Turkish gardens at that time held many beautiful cultivated forms of anemones and these were valued almost as much as tulips.

The first picture above shows a page from Gerard’s The Herball of 1596At that time Anemone coronaria was called A. tenuifolia. (The modern A. tenuifolia is a species native to South Africa.)   Gerard had twelve forms of the species A. coronaria in addition to several other kinds of anemones.  The variation in the flowers of A. coronaria in its single to double forms can be seen in the woodcut.  The term anemone-flowered is derived from the shape of the flower on the lower right of the picture, which has longer outside petals with shorter petals in the center.

The second picture, also from Gerard’s The Herball, depicts Anemone latifolia, now called A. pavonina.  (I have not been able to find a picture of A. hortensis, which may be depicted in early herbals, but may have been listed under another name at that time.)  The botanical classification system devised by Carolus Linnaeus that we use today had not been created in 1596.  Since then botanists have renamed various plants over and over as they identify distinguishing characteristic of species.

The third picture is from The Garden of Pleasant Flowers, by John Parkinson, of 1629.  More garden forms of anemones were known by then and natural hybrids between the three species listed above increased the diversity of garden anemones.  Both Gerard and Parkinson grew named forms.  The popularity of these plants led to their development as florist plants, grown by specialist gardeners and displayed in pots at flower shows.  The word “florist’ has changed in usage; its meaning today refers to those who primarily sell cut flowers.  Anemones were at that time as well loved as tulips, polyanthus primroses and auricula primroses. The popularity of anemones peaked in the eighteenth century, when over 300 named varieties were known and sold.

Today, all of the old named anemones are gone.  Hybridization and selection in France in the 1800s created the ‘De Caen’ single-flowered type, descended primarily from A. pavonina.   ‘St. ‘Brigid’ double anemones were developed out of A. coronaria in Ireland in the 1880s.  Nowadays, these two strains represent the florist anemones in modern gardens.

The last two pictures above are examples of the modern strain of ‘St. Brigid’ anemones, from my own garden.  The tubers are hardy to USDA zone 7b when left in the ground over winter.  Gardeners in colder zones lift the bulbs and store them over winter, replanting them in spring.  The flowers and foliage do take some frost—the picture of foliage and buds above shows plants two weeks after heavy frosts down to 19 degrees F.  The plants need good drainage, sun, and not too much wet in summer.  In the Willamette valley we can grow them with little or no watering, yet they survive as perennial plants.  They do go dormant earlier in the season with this treatment.  Both ‘St. Brigid’ and ‘De Caen’ anemones bloom best (and all summer) with cool summer temperatures and regular watering.  The cut flowers are beautiful and colorful.  Several of the still life pastel paintings by Odilon Redon of France portray the exquisite beauty of these flowers.  Why not try growing some!

Some Historic Bearded Iris

Standard

http://historiciris.orgphoto (69)photo (76) photo (77) photo (78)

These are a few historic bearded iris I grow in my garden in Corvallis, Oregon. I have over 30 varieties of historic iris, but since I just moved my garden this year, only a few bloomed in their temporary pots.

The top picture is of Iris violacea grandiflora.  The variety was discovered in the wild by D. Barry in 1856 and when in bloom is about 36 inches tall.  The standards (the upper petals of the bloom) are a rich blue, the falls (the bottom petals) are violet blue.  The flowers are considered a self in iris classification terminology, meaning all petals are the same color or of one overall color.  It is almost a bitone, meaning the standards and falls are two tones of the same color.  The flowers are fragrant.

The second picture is Iris swertii a natural hybrid collected in 1612.  In iris classification terminology it is a plicata, meaning it has a pale base color with a darker margin.  The petals of this variety curl under in an interesting way.  It is a vigorous grower to 31 inches.

The third picture is of Mrs. ‘Horace Darwin’ hybridized by Sir Michael Foster and released in 1888.  The flower is a white self meaning it has standards and falls all one color.  It has some purple veining on the falls and grows to about 20 inches tall.  The fragrance of this flower is delightful.

The last picture shows ‘Bertha Gersdorff’ hybridized by Sass and released in 1942.  When originally released, there was no classification for the unusual flowers of this variety.  It  was termed a fancy or fancy plicata.  Since 1972, this color pattern has been termed a luminata.  A true luminata has falls with paler, rather than darker veining on the petals; the hafts, the top part of the falls, where the petals connect to the rest of the flower, are unmarked.  This variety makes an excellent show in the garden.

Iris make wonderful garden plants.  Several of them are winter hardy to USDA zone 1, most to zone 3, and they can be grown in mild climates as well.  I have grown them in various climates in the western U.S., even in the low desert.  Good drainage is important, as well as full sun and an airy situation without competition from neighboring plants.  Water regularly in spring until six weeks after blooming, then watering can be reduced.  This is an advantage in the dry summers in much of the western U.S.  The best time to divide and replant is in summer after the bloom period.  Bone meal is an excellent fertilizer, mixed into the soil when planting with a top dressing applied in fall.  Bearded iris are adaptable to different kinds of soil, but prefer a neutral to alkaline pH.  Lime can be mixed into soils that are too acidic.   For more information about historic iris, visit the website of the Historic Iris Preservation Society at historiciris.org


Finding Lost Roses

Standard

photo (71) photo (72) photo (73) photo (74)

A way to save old, rare roses from extinction is to look for them around the area in which you live.  Every region of the U.S. has roses, even Hawaii.  Of great value are old, found roses that are well adapted to local conditions.  They can be found in a number of places: in a neighbor’s yard, in a cemetery, around an abandoned homestead, etc.  Above are four examples of “found” roses.  When located and propagated each of these roses was given a collection name; a temporary or study name. This name will distinguish it from other roses until the plant is identified as to its original, true name, by experts.  When  describing these found plants in writing, the collection names are placed in double quotes.

The first picture is of a potted plant of “Charles Walker’s Lawrenciana” a rose found in the south by Mr. Walker.  The rose class Lawrenciana is an early classification for miniature roses brought from Asia during the late eighteenth and early nineteenth centuries.  Some hybridizing was done between varieties of these early miniature roses.  Nowadays it is very difficult to find any of them for sale in nurseries; few survive anywhere.  The San Jose Heritage Rose Garden collection holds a few of them and The Vintage Gardens collection in Sebastopol has several.  The Lawrencianas are everblooming in mild climates and are about as hardy as hybrid teas.

The second picture is of  “Thomasville Old Gold” a lovely true tea rose, found in Georgia years ago.  It has yet to be identified.  It grows to six feet in mild climates.  It blooms through the warm season and in winter in the desert.  Any rose classified as a true tea will grow well in USDA climate zones 7 to 11.

The third picture is of a rose I found in the garden of my new home in Corvallis Oregon.  It is shade tolerant and probably a member of the rambler class of roses.  (Ramblers are a class of climbing roses).  The great age of hybridizing ramblers was from about 1890 to 1930.  This plant blooms once a season and has beautiful fragrant flowers with disease resistant foliage.  I call it “Old Cottage Red Rambler”.

The fourth picture above is of “McClinton Tea”, a rose found in Texas by the folks at The Antique Rose Emporium nursery.  It is extremely fragrant, floriferous and a large plant to about seven feet.  It is a tea rose, so does best in USDA zones 7 to 11.  It has yet to be identified, but some rosarians think it may be either ‘Madame de Tartas’, or the true ‘Adam’.  In any case, this and all the roses above are worth growing and saving.

I urge you to collect, propagate and grow some of the unknown roses in your area.  It is important to save them, because so many old roses have been lost.  You might find a rare rose that has been thought to be extinct!  A good way to do this is to continually look for interesting roses.  When you do, ask the owner politely for cuttings.  Never uproot an entire plant.  Several rosarians collect cuttings with sharp shears, plastic bags and a cooler if the weather is hot.

The best way to take cuttings is cut them about 6 to 8 inches long (about the size of a pencil).  Cut from ripened wood.  A cutting made from the stem of a fading or finished bloom is excellent, or cuttings from dormant stems in late fall or winter.  Try to take 6 cuttings of each variety, marking the bag with a study name.  Once home, dip the ends of the cuttings in rooting gel or a paste made from powdered rooting compound and water.  Next place the cuttings up to half their length, removing lower leaves, in one of these various mediums: pure coarse, clean sand, or a mix of 1/2 peat and 1/2 perlite, or right into soil.  Then cover the cuttings with glass jars, or plastic bags over pots, or in a cold frame.  Do not place them in direct sun.  I have had the best luck out of doors in bright, but compete shade.  Cuttings can be easily struck by some of the new cloners or in a well-managed greenhouse.  See my last week’s blog post for links to the Heritage Rose Foundation and The Heritage Roses Group for additional information.  Another site with great information is helpmefind.com  Good luck!