


Hello Everyone! I am late this week with a post as I have moved my garden to Montana where I will grow organic bedding plants, perennials, roses, shrubs and fruit trees for Westland Seed, Inc.
More next week!

Hello Everyone! I am late this week with a post as I have moved my garden to Montana where I will grow organic bedding plants, perennials, roses, shrubs and fruit trees for Westland Seed, Inc.
More next week!


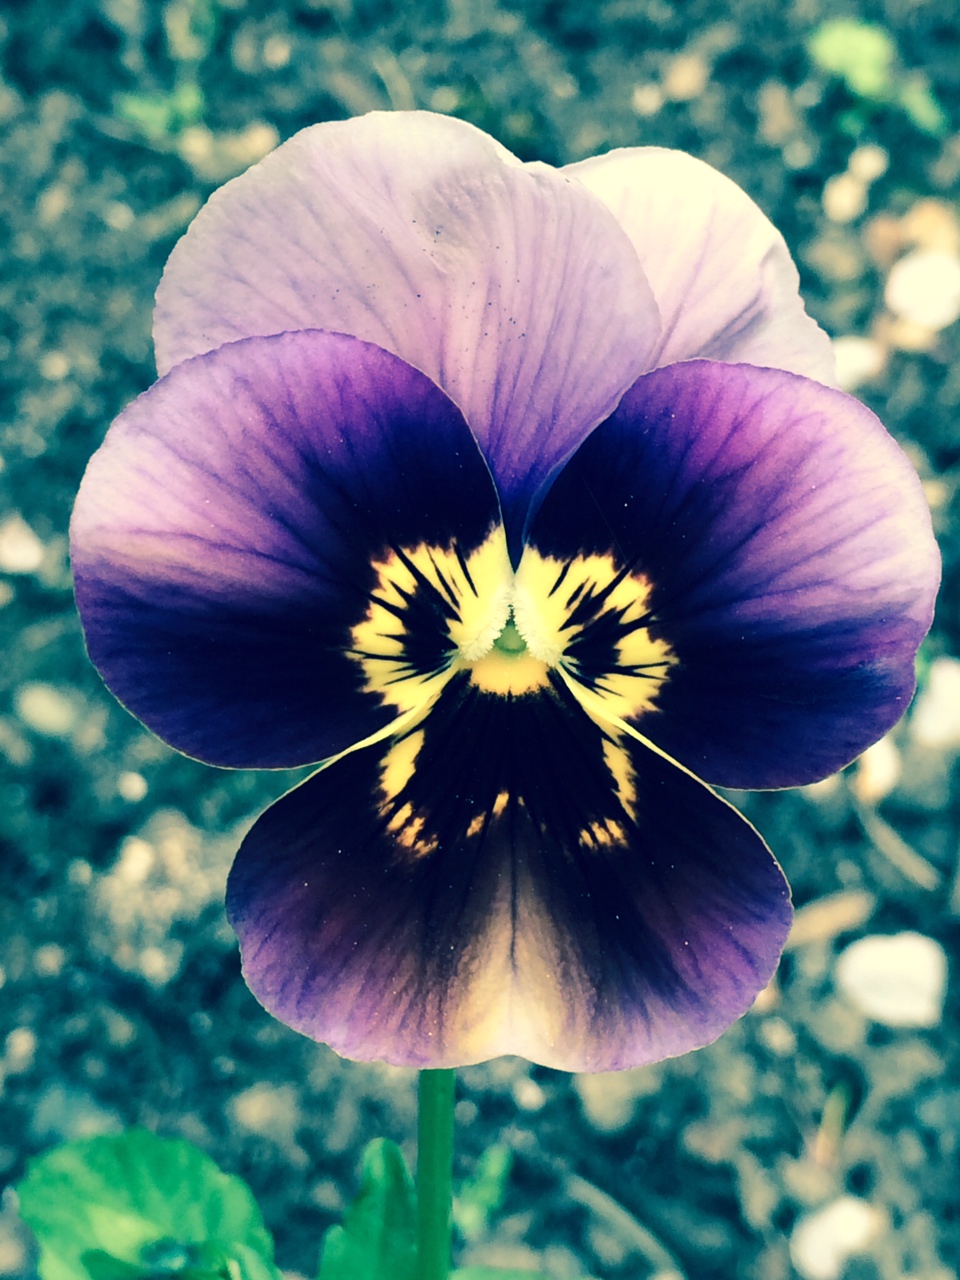


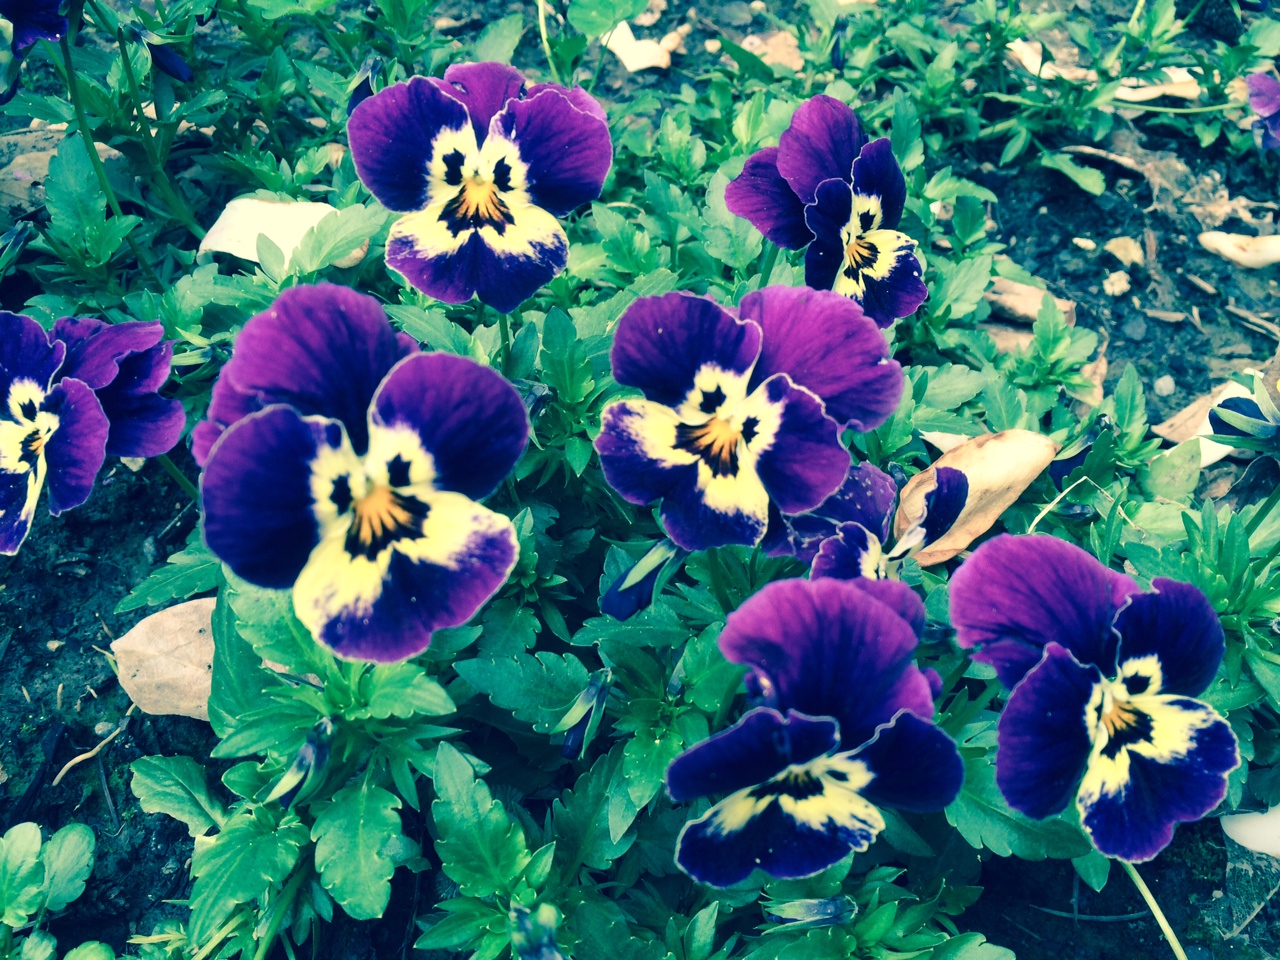
This week I thought I would show pictures of the Historic Florist pansies I grew from seed. The top photo is of my pansy bed; the others show the diversity of blooms and colors of antique pansies. The flowers are fragrant and almost all of the blooms have a “face”. More information is available in my first blog on this WordPress site, which describes the origin of pansies in England during the 1830s.
This week I am moving to Montana from Oregon, so this blog is one day late and quite brief. I will manage a new organic nursery and greenhouse—a new division of Westland Seed, Inc., Ronan, Montana.
Happy growing!
April is another busy month for gardeners; usually a month characterized by ups and downs in temperature. Keep watch for frosts; protect cold frames with mats if frosts are imminent, and admit air daily as weather permits. Finish pruning fruit trees if not done, plant grapes; fertilize and prune blackberries. Check your fruit trees and roses for pests as soon as they bud and leaf out and set out apple pest traps two weeks before bud break. Weed and amend all your beds now while it is cool and moist.
Finish planting fruit trees, shrubs, roses, and perennials. This month is a good time to direct sow (where they are to flower)seeds of several flowers: sweet alyssum, cornflowers, carnations, pinks, poppies, stocks, rose campion, Lychnis, columbines, valerian, honesty, foxglove, snapdragons, mignonette, larkspur, kiss-me-by-the-garden-gate and four-o’clocks. Perennials still may be divided if weather has not become too warm. Violets can be divided after blooming and cuttings taken of pansies. Make cuttings of chrysanthemums, gauras, Helianthus, lupines, Lychnis, Liatris, knautias, saponarias, scutellarias and veronicas. Dahlias and tigridias may be started inside in cold climates and planted out later after frosts are over, or planted outside if the soil temperature is above 60 degrees F.
Several vegetables can be direct sown if weather permits and it is not too cold: beets, arugula, carrots, caraway, celery, chervil, chives, cilantro, dill, fennel, collards, mache, fava beans, cress, kale, Jerusalem artichokes, kohlrabi, leeks, lettuce, mustard greens, rhubarb, turnip greens, onions, pasley, parsnips, peas, potatoes, radishes, salsify, scallions, spinach and Swiss chard. Sunflowers and tomatillos can be sown two weeks before the last expected frost.
Corn may be sown after April 15th in cool maritime northwest climates, or a week or two later in the inland and mountain areas. Usually corn is sown about 10 days to two weeks before the last frost. Native Americans of the Hidatsa tribe living in the Dakotas planted sunflowers first, then corn, and after frosts followed with beans and finally, squash. Sunflowers were grown by themselves in a field, but corn, beans and squash were grown together; with corn in hills of 6-8 and beans and squash vining through.
Vegetables started last month indoors may be planted out this month: the brassicas, parsley, Asian greens, rhubarb and tomatoes; once frosts are over.
Prune established roses before bud break and seal the cuts with water-based glue or wood glue. This prevents drilling wasps from injuring the canes. Fertilize organically with Epsom salts, manure or compost, bone meal or rock phosphate, alfalfa meal and seaweed or wood ashes.
A few things maybe grafted now: grapes, hollies, pears, maples, pines and clematis. Layers can be made of Cotoneaster, Cotinus, Hydrangea, Lavandula, Lonicera and Parthenocissus.
Enjoy spring!


Many of us get a good feeling from planting seeds and watching them grow when outside it is still dark and cold. But inside, we are planning for spring planting. We can start the varieties we want—perhaps a favorite is not available locally as a transplant or as seed; we can raise it ourselves from seed!
Most everyone I know has good luck starting seeds in a sterilized seedling mix. It may be difficult to find an organic seedling mix; and it must be sterile or seedlings might dampen off from fungi present in the air and abundant in unpasteurized soil mixes. A mix I make is soil free: 6 parts sterile (pasteurized)peat moss + 3 parts fine perlite + 1 part washed coarse sand. If you are unsure if your mixture is sterile or not the mix may be heated in an oven at 160 degrees for one hour. Do not allow the mix to heat above 180 degrees. A mixture including compost would need to be sterilized by heating to use for seedlings.
Several types of containers might be used to start your seedlings. In the first picture above, I used a milk carton cut laterally, providing two useful containers. Shown are pepper seedlings. Peat pots work well for plants that are difficult to transplant, because they minimize transplant shock and biodegrade into the soil. Be sure to keep them quite moist once planted, because if the peat pots become too dry, roots will not penetrate the container. Some plants that benefit from being raised in peat pots and are difficult to transplant are: portulaca, nasturtiums, sunflowers, poppies, eggplant, squash, cucumbers, melons and pumpkins. Peat pellets also work, but they sometimes are so hard that roots have difficulty growing in them.
Timing is another important factor in raising seedlings. Your transplants should be big enough to mature and produce in your season, but not too big, or they will not take off well and will take up a lot of room in the house. Here is a basic seed planting guide, categorized month-by-month, of which seeds to plant at what time for success in northern climates of 100 to 170 days. (Adjust timings to your local climate):
In January plant impatiens, begonias, geraniums and salvias. Late January or early February is a good time to start eggplant, peppers, onions, petunias and pansies. March is probably the best month to start cole crops (brassica family). April is a good time to start tomatoes and balsam; late April or early May for pumpkins, squash, melons, cucumbers, and nasturtiums.
Florescent grow lights with an adjustable chain are a great help in starting nice seedlings; the lights can be lowered with the chain to keep the newly emerged seedlings in bright light. This will prevent your plants from getting “leggy”. Temperatures vary for germination: cole crops about 65 degrees, onions about 70, tomatoes about 75 and eggplant, peppers, squash, melons, cucumbers and nasturtiums about 80 degrees.
Make sure your seedling mix is not too wet. Some seeds like to germinate on the dry side, such as tomatoes and peppers. I cover my newly-planted seeds with plastic wrap, but check them twice daily for moisture and rotate them if necessary. Once the seeds are just up, I loosen the wrap (a little more each day) to harden the babies off to the air. Grow your plants on in cooler conditions than you germinated them and they will grow stockier. A cold frame is just about the best place you can put them if it is not too cold outside. In a south-facing cold frame the soil will remain warm at night, and daytime venting will give the plants fresh air. Keep shade cloth handy if it tends to get too hot during the day in your area. This is a common occurrence in dry, sunny climates with warm days and frosty nights. The second picture above shows newly transplanted seedlings in a cold frame vented for the day. A cold frame will harden-off your plants before planting out. Don’t forget to place open-ended containers around plants as you place them in the garden to deter cutworms. Good luck!


In my organic garden of heirloom plants here in Oregon, we have several pests: deer, raccoons, dogs, squirrels, rats, slugs, cabbage looper larvae and cutworms. Cutworms have been the most consistently damaging of the group. Typically, they sever the stems of young transplants, a preferred food of theirs. They also eat most of the plants I grow; all vegetables, but especially plants of the Brassica, Dianthus, Primula and Viola families. Here, they are a year-round pest, perhaps because of the mild weather of the region. Cutworms belong to the family Noctuidae. Note that the Latin root word here “noctu” refers to night—the time when these insects feed. They come out about two hours after dark to feast, then disappear under the soil for the day. Some cutworm eggs overwinter and hatch in spring, but others can hatch at any time after, as long as it is not too cold. Evidently there is one generation per year. The adult moths emerge in late summer and lay eggs which can hatch at varying times of the year. Several species exist: the Army cutworm, Black cutworm, Variegated cutworm, and a new species here in Oregon, which is active year round, the Winter cutworm. The first picture above shows a cutworm that appeared on heirloom petunia seedlings while they were on a bench in my greenhouse. The plants had been transplanted two weeks before, so I was surprised that the cutworm was able to climb so far! the photo was taken in May, so this was probably the variegated cutworm, which we have spring, summer and fall. The second picture shows another cutworm on the edge of a patio planter, three feet above the ground. The other three photos reveal damage on in-ground plants made by Winter cutworms in December, January and February. Cutworms typically leave black droppings on your plants; the photo of the cauliflower shows this.
An organic gardener’s best first defense against cutworms is prevention. A week before plants are to be set out, prepare your bed by cultivating heavily to dislodge and destroy any worms in the soil, then cultivate again. When you plant your transplants, place collars around the plants to make it difficult for the worms to get to your plants. Collars may be made of paper (milk cartons work well), plastic, metal or cardboard. Here it rains so frequently that I choose to use plastic milk jugs or cans with the bottoms cut out of them. After planting, spread one or more of the following sharp-edged deterrent mulches over the soil, around the plants: diatomaceous earth, eggshells, wood ashes or sharp grit. The rough surfaces of any of these will discourage cutworms from crawling to your plants. Another preventive method is to wait until two hours after dark, take a flashlight, search out the larvae and use the squish-bug technique for control. Continue to cultivate around your plants to dislodge hiding larvae. One other way to fight the battle is to attract or purchase beneficial insects to control cutworms. Ground beetles, parasitic nematodes and tachinid flies attack cutworms. Pollen-laden flowers, (don’t forget about native wildflowers) will help draw beneficial insects to your garden.
A next recourse for severe infestations is to use biological pest controls. The bacteria Bacillus thuringensis kurstaki (known as BTK) made into a liquid spray is effective in controlling cutworms as long as you do not have continuous rain, as we often do here in western Oregon. The damaged cauliflower, cabbage and primrose in the photos above show the effects of cutworms in winter, during a three month-long period of rain. Dry BTK can be mixed with moistened bran to act as a bait and will last a few days until washed away. Of course one can use the handpick squishbug method, but it might be difficult to keep up! BTK cannot be used over and over without enabling cutworms to develop resistance. Take care not to spray anything other than the very plants you need to protect when the larvae of butterflies are present. Organically approved pesticides containing pyrethrin may also be used for heavy infestations.

We have to face the fact that here in much of the Northwest we have a short frost-free growing season. Those living at higher elevations have an even shorter growing period. Most gardeners in the area look for ways to extend the vegetable growing season: everyone wants to have ripe eggplants, tomatoes, squash, melons, etc. before the season ends and frosts return. A great help for gardeners is to purchase or construct covers, or cloches, to protect our plants early and late. In the nineteenth century, glass bell-shaped cloches were used, as well as cold frames glazed with glass.
Today, one popular and inexpensive alternative cover is a polyethelyne tunnel, a series of metal hoops over which plastic is stretched. The spring vegetable season can be started up to four weeks earlier with tunnels. The same is true of fall, when it is possible to have crops ready up to six weeks later, because the soil will be warmer in fall and hold its heat longer if cloched. Tunnels are quite useful for heat-loving crops in our frequently cool summers; cantaloupe, watermelons, squash, tomatoes, eggplant, and cucumbers are some examples. Floating row covers will also protect plants at night from colder temperatures. The heaviest will protect plants from frost up to seven or eight degrees of frost.
Plastic jugs, with the caps taken off and bottoms cut out, work well for small plants planted out before late frosts occur. Covers can be placed before nightfall and removed during the day. Gluttonous and ubiquitous cutworms will be discouraged from chewing by the subterranean sharp edges of the jugs; this is important because these creatures feed at night. Large metal cans and paper milk jugs are other inexpensive cloches.
Cold frames are excellent cloches or protectors of young plants. The soil inside them stays much warmer at night than the outside air. If mats or fabric floating row covers are used to cover plants they will protect crops to lower temperatures than uncovered plastic tunnels or jugs. I constructed my own cold frames, though they can be purchased from many sources at a considerable price! An important factor with cold frames is to open them in the morning as soon as temperatures permit and close them before it gets too cold, in late afternoon or early evening.
Paper, glass, water-filled plastic covers or wax coated cloches are other quick solutions to save plants if a late frost is expected. In Montana, in a mountain valley at an altitude of 3,000 feet I have used cloches to save bleeding hearts, primroses, lilies and early spring flowers from sudden freezes that would have set them back considerably.
Have a great spring!
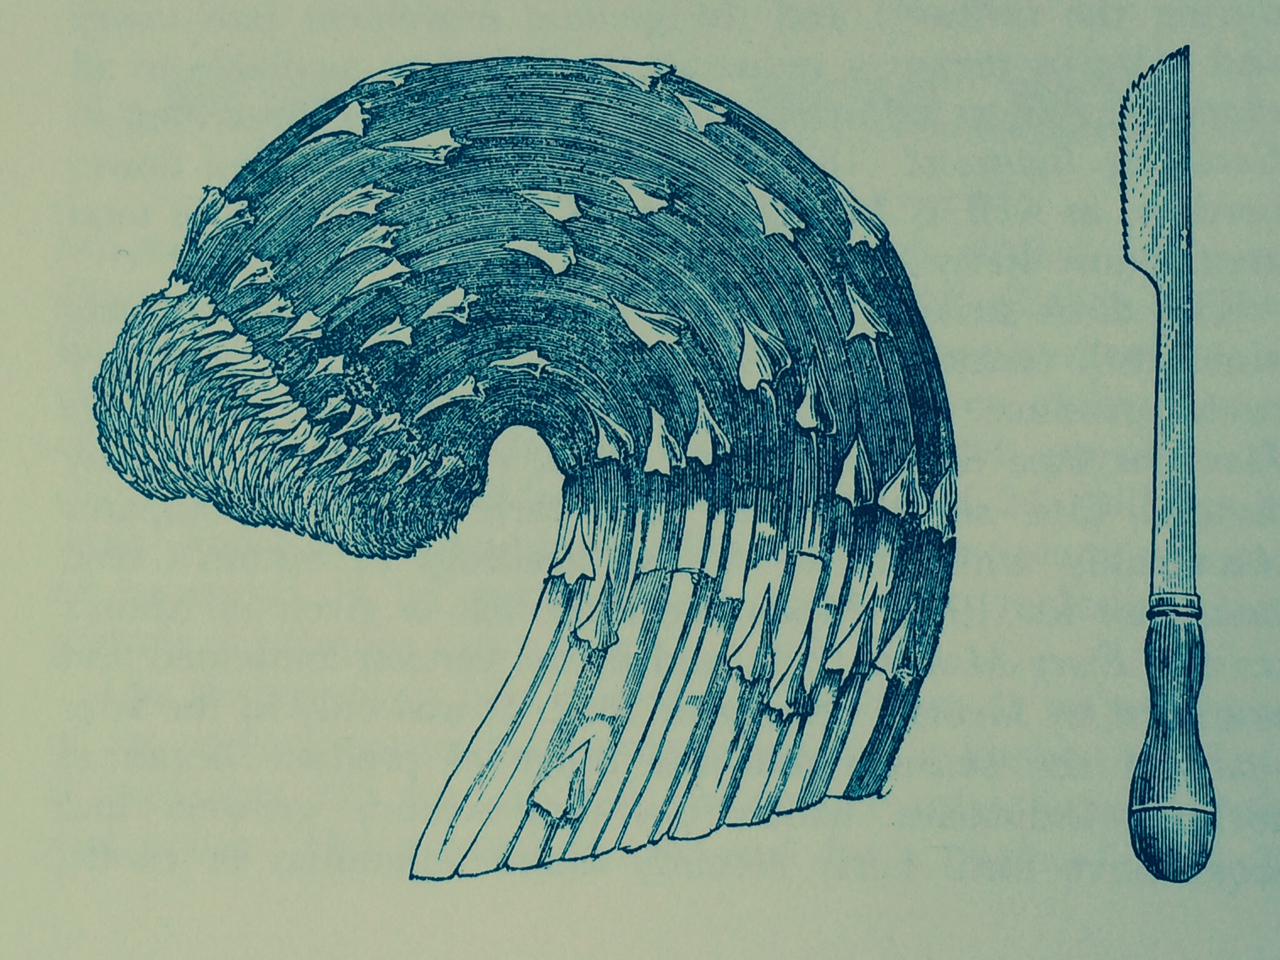
Asparagus (Asparagus officionalis) is a popular vegetable today and was quite popular in the nineteenth century. The photograph above is of an antique variety, ‘Giant Asparagus’ an engraving from The Illustrated London News, dated 1851. An asparagus knife is shown alongside the plant. This year, I grew another old variety of asparagus from seed, ‘Connover’s Collosal’, dating to the second half of the nineteenth century. It is difficult to find plants of heirloom varieties of asparagus, so one has to start them from seed. However, the process is slow, as the plants take three to four years to reach the size for harvesting. (If too many shoots are cut from very young plants, productivity may be reduced, or the plants may die. But if the plants are allowed to become established, an asparagus bed will last twenty years or more, even up to fifty years!)
Late March into early April is an excellent time to start asparagus from seed. Use a sterile medium, cover the seed about 1/4 inch deep and place the pots in a warm location (77 degrees is optimum). The seeds should come up in about ten days. You may direct seed into a bed if soil temperatures are above 50 degrees, it will just take a little longer for the seeds to germinate. Asparagus plants begin to grow slowly and will not be ready to transplant out for about three or four months. Meanwhile you can prepare a bed for them. An ideal spot is in full sun with a bed large enough to accommodate the number of plants you need. It is usually recommended to plant five to six plants per person. Since the plants are perennial (USDA climate zones 4-9) they benefit from a well-prepared bed. Peter Henderson, in his book Gardening for Profit published in 1867, recommended planting transplants nine inches apart in rows three feet wide for commercial growers, or two feet wide for home gardeners.
Once you have established how many plants you need, you can make the planting bed. Henderson recommended trenching the bed two to three feet deep with about three inches of rotted manure mixed into the soil. A deep sandy loam is best for them as they are native to alluvial soils. Bernard Mc Mahon, in Mc Mahon’s American Gardener, published in 1857, recommended double digging two spades deep and placing several inches of rotted manure in the trench, then spreading another layer of rotted manure over the surface. He directed gardeners to mix this second layer of manure with the soil to a depth of eight to ten inches. My young plants, now a year old, have spears a little larger in diameter than a toothpick. The young plants may be grown in a temporary (sunny) rich bed for another year, then moved to their permanent location. Place the crowns of the plants two inches below the soil surface. Keep the beds weeded to ensure quick, even growth. Mc Mahon recommends three years from planting (which would be four years from sowing seed) before cutting can begin. Dress the bed every spring with rotted manure, bone meal and wood ashes.
If your family really enjoys asparagus, plant more than five plants per person; I plant twelve per person. If you plant two-year transplants, spread the roots out like the spokes of a wheel and cover with about one inch of prepared soil. Water well. As the plants grow, cover them with more soil until you have them two inches under. Do not use fresh manure as it will burn them and (heaven forbid) do not use chemical fertilizers, especially on newly planted asparagus. Wait two years to begin cutting. A summer mulch of three inches of straw is excellent, will protect the plants in winter and the spears will come up earlier in the spring if the ground is not frozen too deeply.
When you cut asparagus spears get them into the refrigerator right away or cook them immediately because they lose flavor as quickly as sweet corn does. Considering how expensive asparagus is, I find the start up work well worth while. Enjoy!
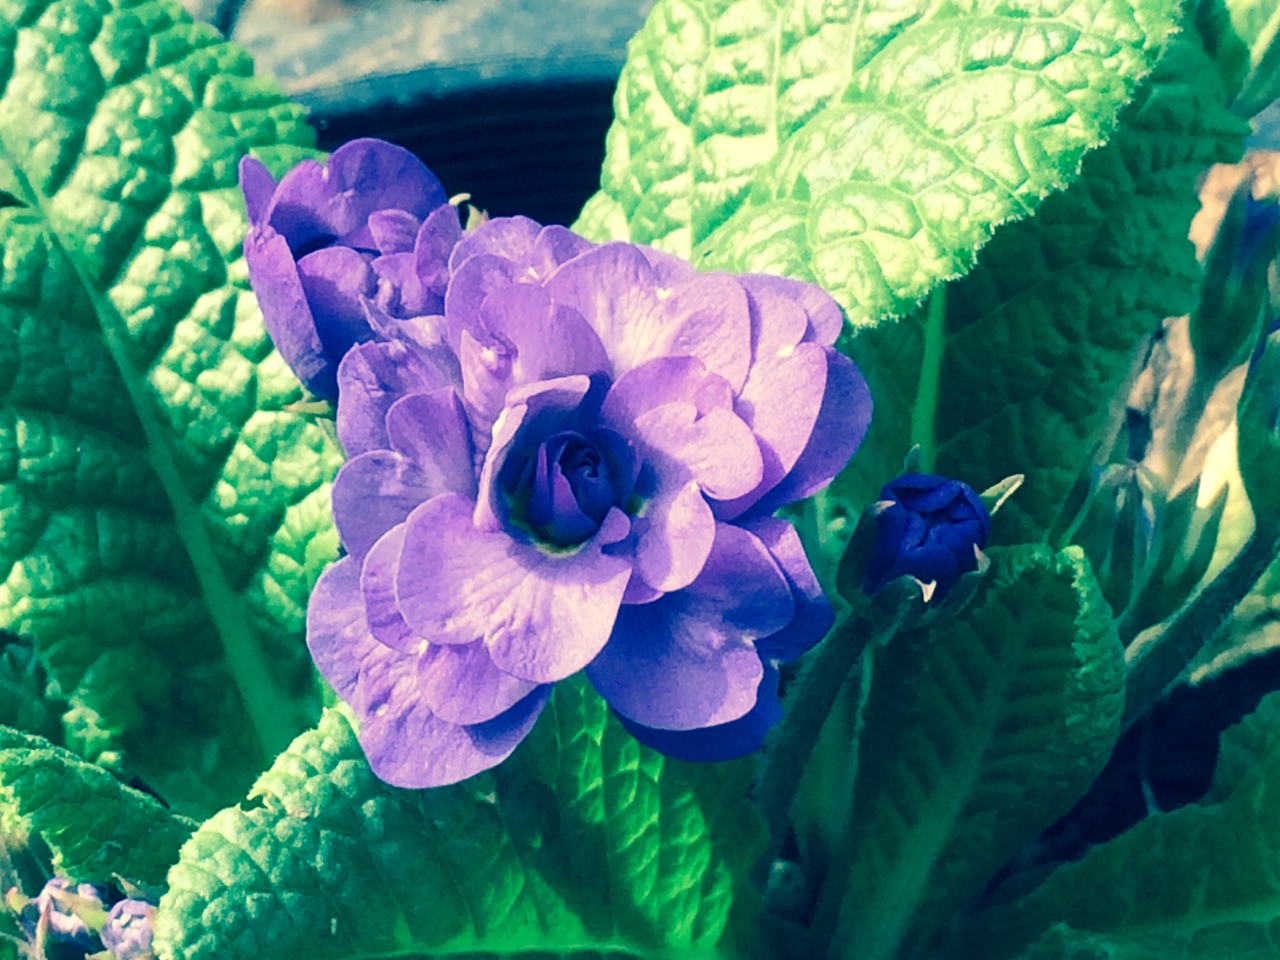
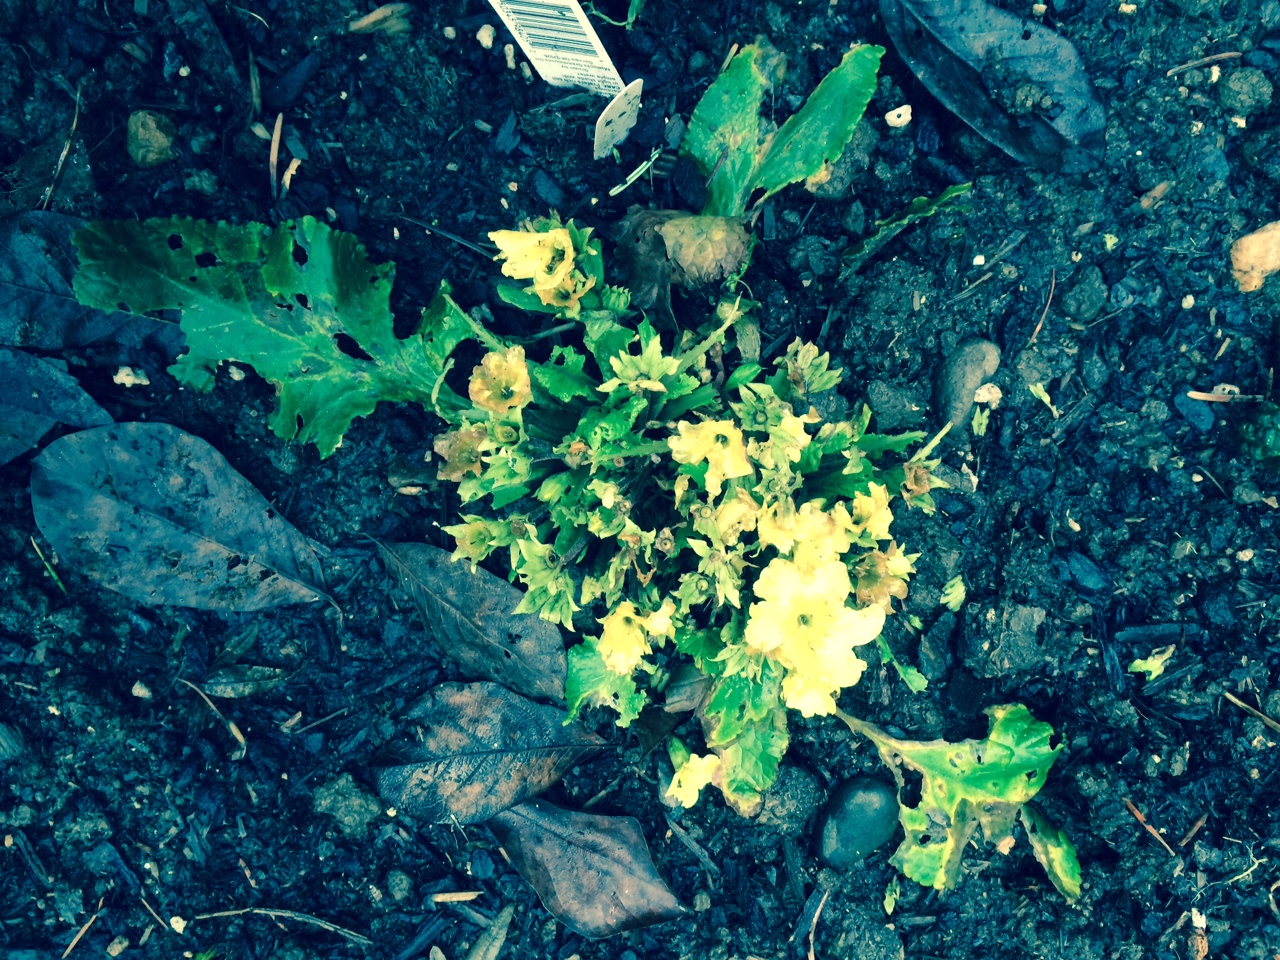
This photo is of a double blue primrose seedling, blooming now in Corvallis, Oregon.
March is a very busy month for gardeners. Root crops stored from the previous year and planned to produce seed can be planted out late in the month after the soil thaws (cabbages, celery, lettuce, leeks, onions, parsnips). Planting time will arrive soon, or has already arrived for those of you in mild climates. Weed and clean borders and vegetable beds, plant perennials, sow seeds of hardy annuals, plant rhubarb, asparagus, sea kale and artichokes. Plant and/or prune cane fruits and fruit trees (cherries, apples, peaches, apricots, pears, plums, currants, gooseberries, etc.). Check cold frames on a regular basis, venting as needed and closing the glazing panels at night. Watch temperatures in the greenhouse also, as March is a month of ups and downs in temperature. Manure and other organic soil amendments (epsom salts, seaweed meal, alfalfa meal, greensand, bone meal, compost and wood ashes) can be spread over vegetable, fruit, flower and rose beds. Grape vines can be manured now, leaving space around the stem; treat roses in the same manner.
Many vegetables can be sown indoors now for transplanting out later: cole crops (brassicas), onions, lettuce, peppers, eggplant and leeks. Some vegetables can be direct sown outside if weather permits and if your soil is not too wet to work: arugula, carrots, corn salad, fava beans, cress, mustard and turnip greens, onions, peas, radishes and spinach. Celery and lettuce can be direct sown into frames. Several vegetables and fruits can be transplanted now: raspberries, blackberries, strawberries, asparagus, horseradish, head lettuce, onion sets and plants and perennial herbs. Make sure your mushroom beds do not get too wet; replace straw if wet.
Potted auricula primroses should be protected from rain and frosts; they will begin to bud soon. Sow any remaining auricula and primrose seeds. Herbaceous perennials can be divided and planted now. Many hardy annual flowers may be sown during March: larkspur, sweet peas, lychnis, nigella, lavatera, poppies, kiss-me-by-the-garden-gate and sweet alyssum. Inside the greenhouse sow: petunias, impatiens, pansies, alyssum, chrysanthemums, iceplants, portulacas, salvias, snapdragons, sweet Williams, ten-week stocks, mignonette, hesperis, Shasta daisies, hibiscus, lupine and Salvia x superba.
Roses and other shrubs may be layered now, and cuttings may be made of geraniums, myrtles and hydrangeas. If you want to plant a hedge from seed, now is the time to sow seeds of hawthorns, stone fruits, roses and other hardy shrubs you might like to use. The young plants can be transplanted out to their permanent positions later.
Happy Spring!
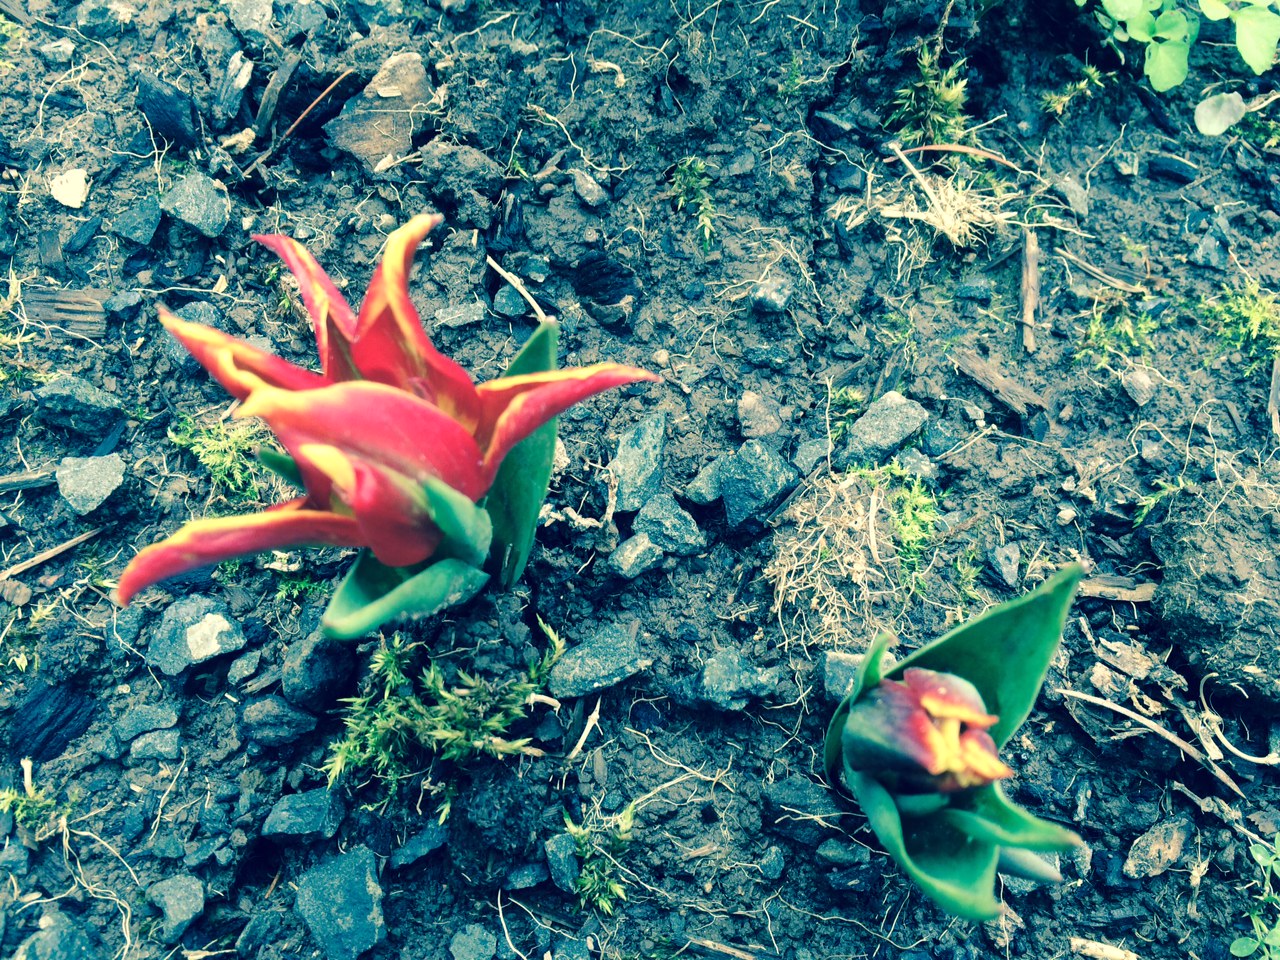


I have several more wonderful heirloom flowers blooming here in Oregon in late February. Tulipa schrenkii is shown in the first photograph. It was introduced into Europe in 1608 from Turkey and is rare today. The rather pointed petals are a warm red, margined with golden orange. John Parkinson described and illustrated this tulip (though botanists have changed its name) in his great work A Garden of Pleasant Flowers, published in 1629. He calls it “Tulipa pracox rubra oris luteia. The early red tulipa with yellow edges, or the Duke.” This species was an ancestor to the ‘Duc van Tol’ tulips, which were developed to be forced into bloom and sold, during the seventeenth and eighteenth centuries. Tulipa schrenkii is hardy in USDA zones 3-9.
Tulips are fairly easy to grow. they prefer sandy or light soil, full sun, and a dry summer. If you live in an area with rainfall in summer, you can dig them and store them in in netted bags or open boxes until October, then plant them again. The bulbs will increase under such treatment. I cover my bulbs with poultry netting to discourage cats from scratching the bed and squirrels from digging the bulbs.
The beautiful. fragrant Narcissus orientalis known in the nursery trade as ‘Grand Soleil d’Or’ is illustrated I’m the second picture above. This plant is illustrated in Parkinson as well, labeled ‘Narcissus Africanus aureus major.’ He compares it in size to the beautiful ‘Primrose Peerless’, and mentions that it is of “…exceeding sweet a sent” (I have used the modern “s” instead of the antique “f” used in 1629). Parkinson also mentions the “blackish brown coate or skinne” covering the bulbs. This narcissus is forced in great quantities today and has a delicious scent. Out of doors, it is hardy in USDA zones 8-10 and needs a dry summer as well, being native to northern Africa and Asia Minor. I have grown this variety inside the house; in the low desert in California, and now here in Oregon (in the warmest, sunniest spot available). It is beautiful and indispensable in my garden.
The third photograph depicts Vinca minor or periwinkle, just beginning to bloom here. It has been grown since Roman times and Pliny refers to it as Pervinca. Chaucer used the spelling “Pervinke”. The plant is a vining groundcover with evergreen leaves and lovely blue flowers. Periwinkle loves part shade and a moderate amount of water. A white form exists, as well as a double blue and a plum-colored single. Vinca minor is hardy in USDA zones 4-10.
An important feature of these three plants is that they can be grown with moderate water, an important factor in the increasingly dry climate of the U.S.
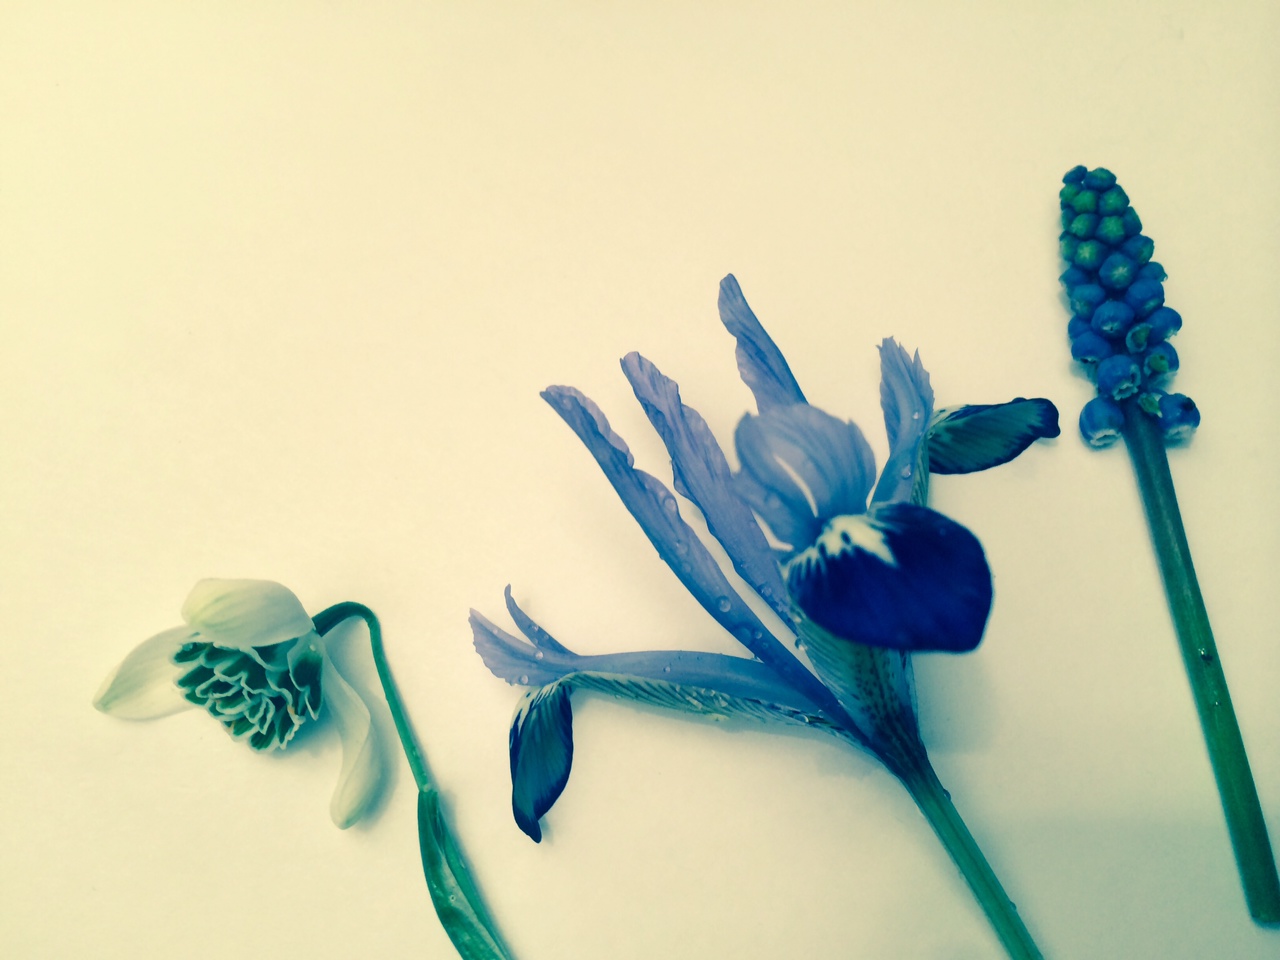


The three flowers above are the first to bloom in my garden this year. The first photo shows blooms (from left to right) of: Galanthus nivalis flore pleno, the double snowdrop; Iris reticulata; and Muscari botryoides, the grape hyacinth. The snowdrop and the iris were planted last fall (2015) and the grape hyacinths were here in the garden from times past.
The double snowdrop is a beautiful flower, having rows of green and white petals that resemble the old-fashioned layered petticoats worn in the nineteenth century and before. The single form was known in ancient times and is described by Theophrastus. It is illustrated in Gerard’s The Herball of 1596 and was considered a type “bulbous violet” at that time. The double form, illustrated above, occurred in the eighteenth century. It blooms slightly later than the single form, but is quite unusual and uncommon today. G. nivalis is native to Europe and likes cool, rather moist conditions and cold winters (USDA zones 3-8). I have mine planted in part shade under a Pieris tree. Snowdrops have a faint, earthy fragrance and will begin to bloom as soon as the snow melts.
Iris reticulata, which does not seem to have a common or folk name, is native to Turkey, Iran and the Caucuses Mountains. Bulbs reached Europe and North America in the mid-nineteenth century; nowadays several forms and colors are available. The flowers have an unusual violet-like fragrance. The plant is beautiful and undemanding, preferring full sun, rather alkaline, gritty soil and dry conditions in summer. I. reticulata thrives in USDA zones 4-9 and multiplies well.
Muscari botryoides is the original “grape hyacinth” known since at least 1596 and is illustrated in Gerard’s Herball. It resembles the commonly grown Muscari armeniacum, but blooms earlier. It is hardier as well, growing in USDA zones 2-8. M. botryoides has sterile upper flowers which are lighter in color than those below. The flowers have a fragrance of honey. M. botryoides has almost disappeared from modern bulb catalogs, but if you search, you may fnd it growing in old established gardens, or around abandoned home sites. I am lucky that it was planted in the garden of my house, built in the 1920s. The flowers are just opening here in mid-February.
